
How to deploy Nest.js microservices using Kubernetes
The aim of the project is to use Nest.js to build a microservice project that communicate via gRPC and a gateway service to expose API, use RabbitMQ to handle message queues, and ELK for log management. Finally, Docker and Kubernetes will be used for building and deploying those services.
To view the full example, please visit learn-backend on GitHub.
Code Structure
.
├── apps
│   ├── gateway
│   │   ├── src
│   │   │   ├── gateway.module.ts
│   │   │   ├── gateway.controller.ts
│   │   │   └── main.ts
│   │   └── tsconfig.app.json
│   ├── product
│   │   ├── src
│   │   │   ├── main.ts
│   │   │   ├── product.module.ts
│   │   │   └── product.controller.ts
│   │   └── tsconfig.app.json
├── docker
│   ├── Dockerfile.gateway
│   └── Dockerfile.product
├── k8s
│   ├── gateway-deployment.yaml
│   └── product-deployment.yaml
├── proto
│   └── product.proto
├── types
│   └── proto
│       └── product.ts
├── tsconfig.build.json
├── tsconfig.json
├── nest-cli.json
├── package.json
├── pnpm-lock.yaml
Using Nest.js to create monorepo
First, follow the Workspaces guide to create a Nest.js monorepo project.
nest new gateway
cd gateway
nest generate app product
Using gRPC for communication
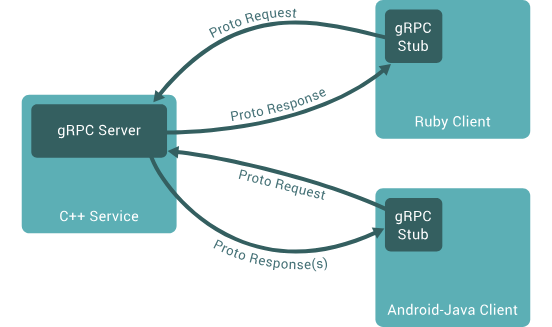
A microservice is essentially an application that uses a different transport layer than HTTP. We can use gRPC, Thrift, or even just TCP as the transport layer. In this case, we will use gRPC. gRPC is a modern open source high performance Remote Procedure Call (RPC) framework that can run in any environment. It can efficiently connect services in and across data centers with pluggable support for load balancing, tracing, health checking and authentication. It is also applicable in last mile of distributed computing to connect devices, mobile applications and browsers to backend services.
Protocol Buffers
Since microservice code can be written in various programming languages, we need a language-neutral, platform-neutral, and extensible mechanism for serializing structured data. By default, gRPC uses Protocol Buffers.
The follows code defines protobuf to the `product` microservice.
syntax = "proto3";
package product;
message Product {
  string id = 1;
  string name = 2;
  string description = 3;
  double unitPrice = 4;
  int32 inventoryQuantity = 5;
  string createdAt = 6;
  string updatedAt = 7;
}
message CreateProductRequest {
  string name = 1;
  string description = 2;
  double unitPrice = 3;
  int32 inventoryQuantity = 4;
}
message CreateProductResponse { Product product = 1; }
message GetProductRequest { string id = 1; }
message GetProductResponse { Product product = 1; }
message UpdateProductRequest {
  string id = 1;
  string name = 2;
  string description = 3;
  double unitPrice = 4;
  int32 inventoryQuantity = 5;
}
message UpdateProductResponse { Product product = 1; }
message DeleteProductRequest { string id = 1; }
message DeleteProductResponse { bool success = 1; }
service ProductService {
  rpc CreateProduct(CreateProductRequest) returns (CreateProductResponse);
  rpc GetProduct(GetProductRequest) returns (GetProductResponse);
  rpc UpdateProduct(UpdateProductRequest) returns (UpdateProductResponse);
  rpc DeleteProduct(DeleteProductRequest) returns (DeleteProductResponse);
}
protoc
Since this is a TypeScript project, it is better to transform the protobuf definitions into TypeScript interfaces. We use `ts-protoc` to compile protobuf files to TypeScript interfaces.
First, you need to install `protoc` on your computer. If you are using macOS, simply run:
brew install protobuf
Next, add the follows command to the scripts section of your package.json:
"proto-ts": "protoc --plugin=./node_modules/.bin/protoc-gen-ts_proto --ts_proto_out=./types ./proto/*.proto --ts_proto_opt=nestJs=true,addGrpcMetadata=true,addNestjsRestParameter=true,outputEncodeMethods=false,outputJsonMethods=false,outputClientImpl=false"
This command not only generates TypeScript interfaces, but also generates controller interface for Nest.js.
// Code generated by protoc-gen-ts_proto. DO NOT EDIT.
// versions:
//   protoc-gen-ts_proto  v2.2.5
//   protoc               v5.28.3
// source: proto/product.proto
/* eslint-disable */
import { Metadata } from '@grpc/grpc-js'
import { GrpcMethod, GrpcStreamMethod } from '@nestjs/microservices'
import { Observable } from 'rxjs'
export const protobufPackage = 'product'
export interface Product {
  id: string
  name: string
  description: string
  unitPrice: number
  inventoryQuantity: number
  createdAt: string
  updatedAt: string
}
export interface CreateProductRequest {
  name: string
  description: string
  unitPrice: number
  inventoryQuantity: number
}
export interface CreateProductResponse {
  product: Product | undefined
}
export interface GetProductRequest {
  id: string
}
export interface GetProductResponse {
  product: Product | undefined
}
export interface UpdateProductRequest {
  id: string
  name: string
  description: string
  unitPrice: number
  inventoryQuantity: number
}
export interface UpdateProductResponse {
  product: Product | undefined
}
export interface DeleteProductRequest {
  id: string
}
export interface DeleteProductResponse {
  success: boolean
}
export const PRODUCT_PACKAGE_NAME = 'product'
export interface ProductServiceClient {
  createProduct(
    request: CreateProductRequest,
    metadata: Metadata,
    ...rest: any
  ): Observable<CreateProductResponse>
  getProduct(
    request: GetProductRequest,
    metadata: Metadata,
    ...rest: any
  ): Observable<GetProductResponse>
  updateProduct(
    request: UpdateProductRequest,
    metadata: Metadata,
    ...rest: any
  ): Observable<UpdateProductResponse>
  deleteProduct(
    request: DeleteProductRequest,
    metadata: Metadata,
    ...rest: any
  ): Observable<DeleteProductResponse>
}
export interface ProductServiceController {
  createProduct(
    request: CreateProductRequest,
    metadata: Metadata,
    ...rest: any
  ):
    | Promise<CreateProductResponse>
    | Observable<CreateProductResponse>
    | CreateProductResponse
  getProduct(
    request: GetProductRequest,
    metadata: Metadata,
    ...rest: any
  ):
    | Promise<GetProductResponse>
    | Observable<GetProductResponse>
    | GetProductResponse
  updateProduct(
    request: UpdateProductRequest,
    metadata: Metadata,
    ...rest: any
  ):
    | Promise<UpdateProductResponse>
    | Observable<UpdateProductResponse>
    | UpdateProductResponse
  deleteProduct(
    request: DeleteProductRequest,
    metadata: Metadata,
    ...rest: any
  ):
    | Promise<DeleteProductResponse>
    | Observable<DeleteProductResponse>
    | DeleteProductResponse
}
export function ProductServiceControllerMethods() {
  return function (constructor: Function) {
    const grpcMethods: string[] = [
      'createProduct',
      'getProduct',
      'updateProduct',
      'deleteProduct'
    ]
    for (const method of grpcMethods) {
      const descriptor: any = Reflect.getOwnPropertyDescriptor(
        constructor.prototype,
        method
      )
      GrpcMethod('ProductService', method)(
        constructor.prototype[method],
        method,
        descriptor
      )
    }
    const grpcStreamMethods: string[] = []
    for (const method of grpcStreamMethods) {
      const descriptor: any = Reflect.getOwnPropertyDescriptor(
        constructor.prototype,
        method
      )
      GrpcStreamMethod('ProductService', method)(
        constructor.prototype[method],
        method,
        descriptor
      )
    }
  }
}
export const PRODUCT_SERVICE_NAME = 'ProductService'
Starting RabbitMQ Docker Container
RabbitMQ is a reliable and mature messaging and streaming broker, which is easy to deploy on cloud environments, on-premises, and on your local machine. We use `docker compose` to start a simply container.
services:
  rabbitmq:
    image: rabbitmq:3-management
    restart: always
    container_name: rabbitmq
    ports:
      - 5672:5672
      - 15672:15672
    environment:
      - RABBITMQ_DEFAULT_USER=root
      - RABBITMQ_DEFAULT_PASS=password
    volumes:
      - /var/lib/docker/volumes/rabbitmq:/var/lib/rabbitmq
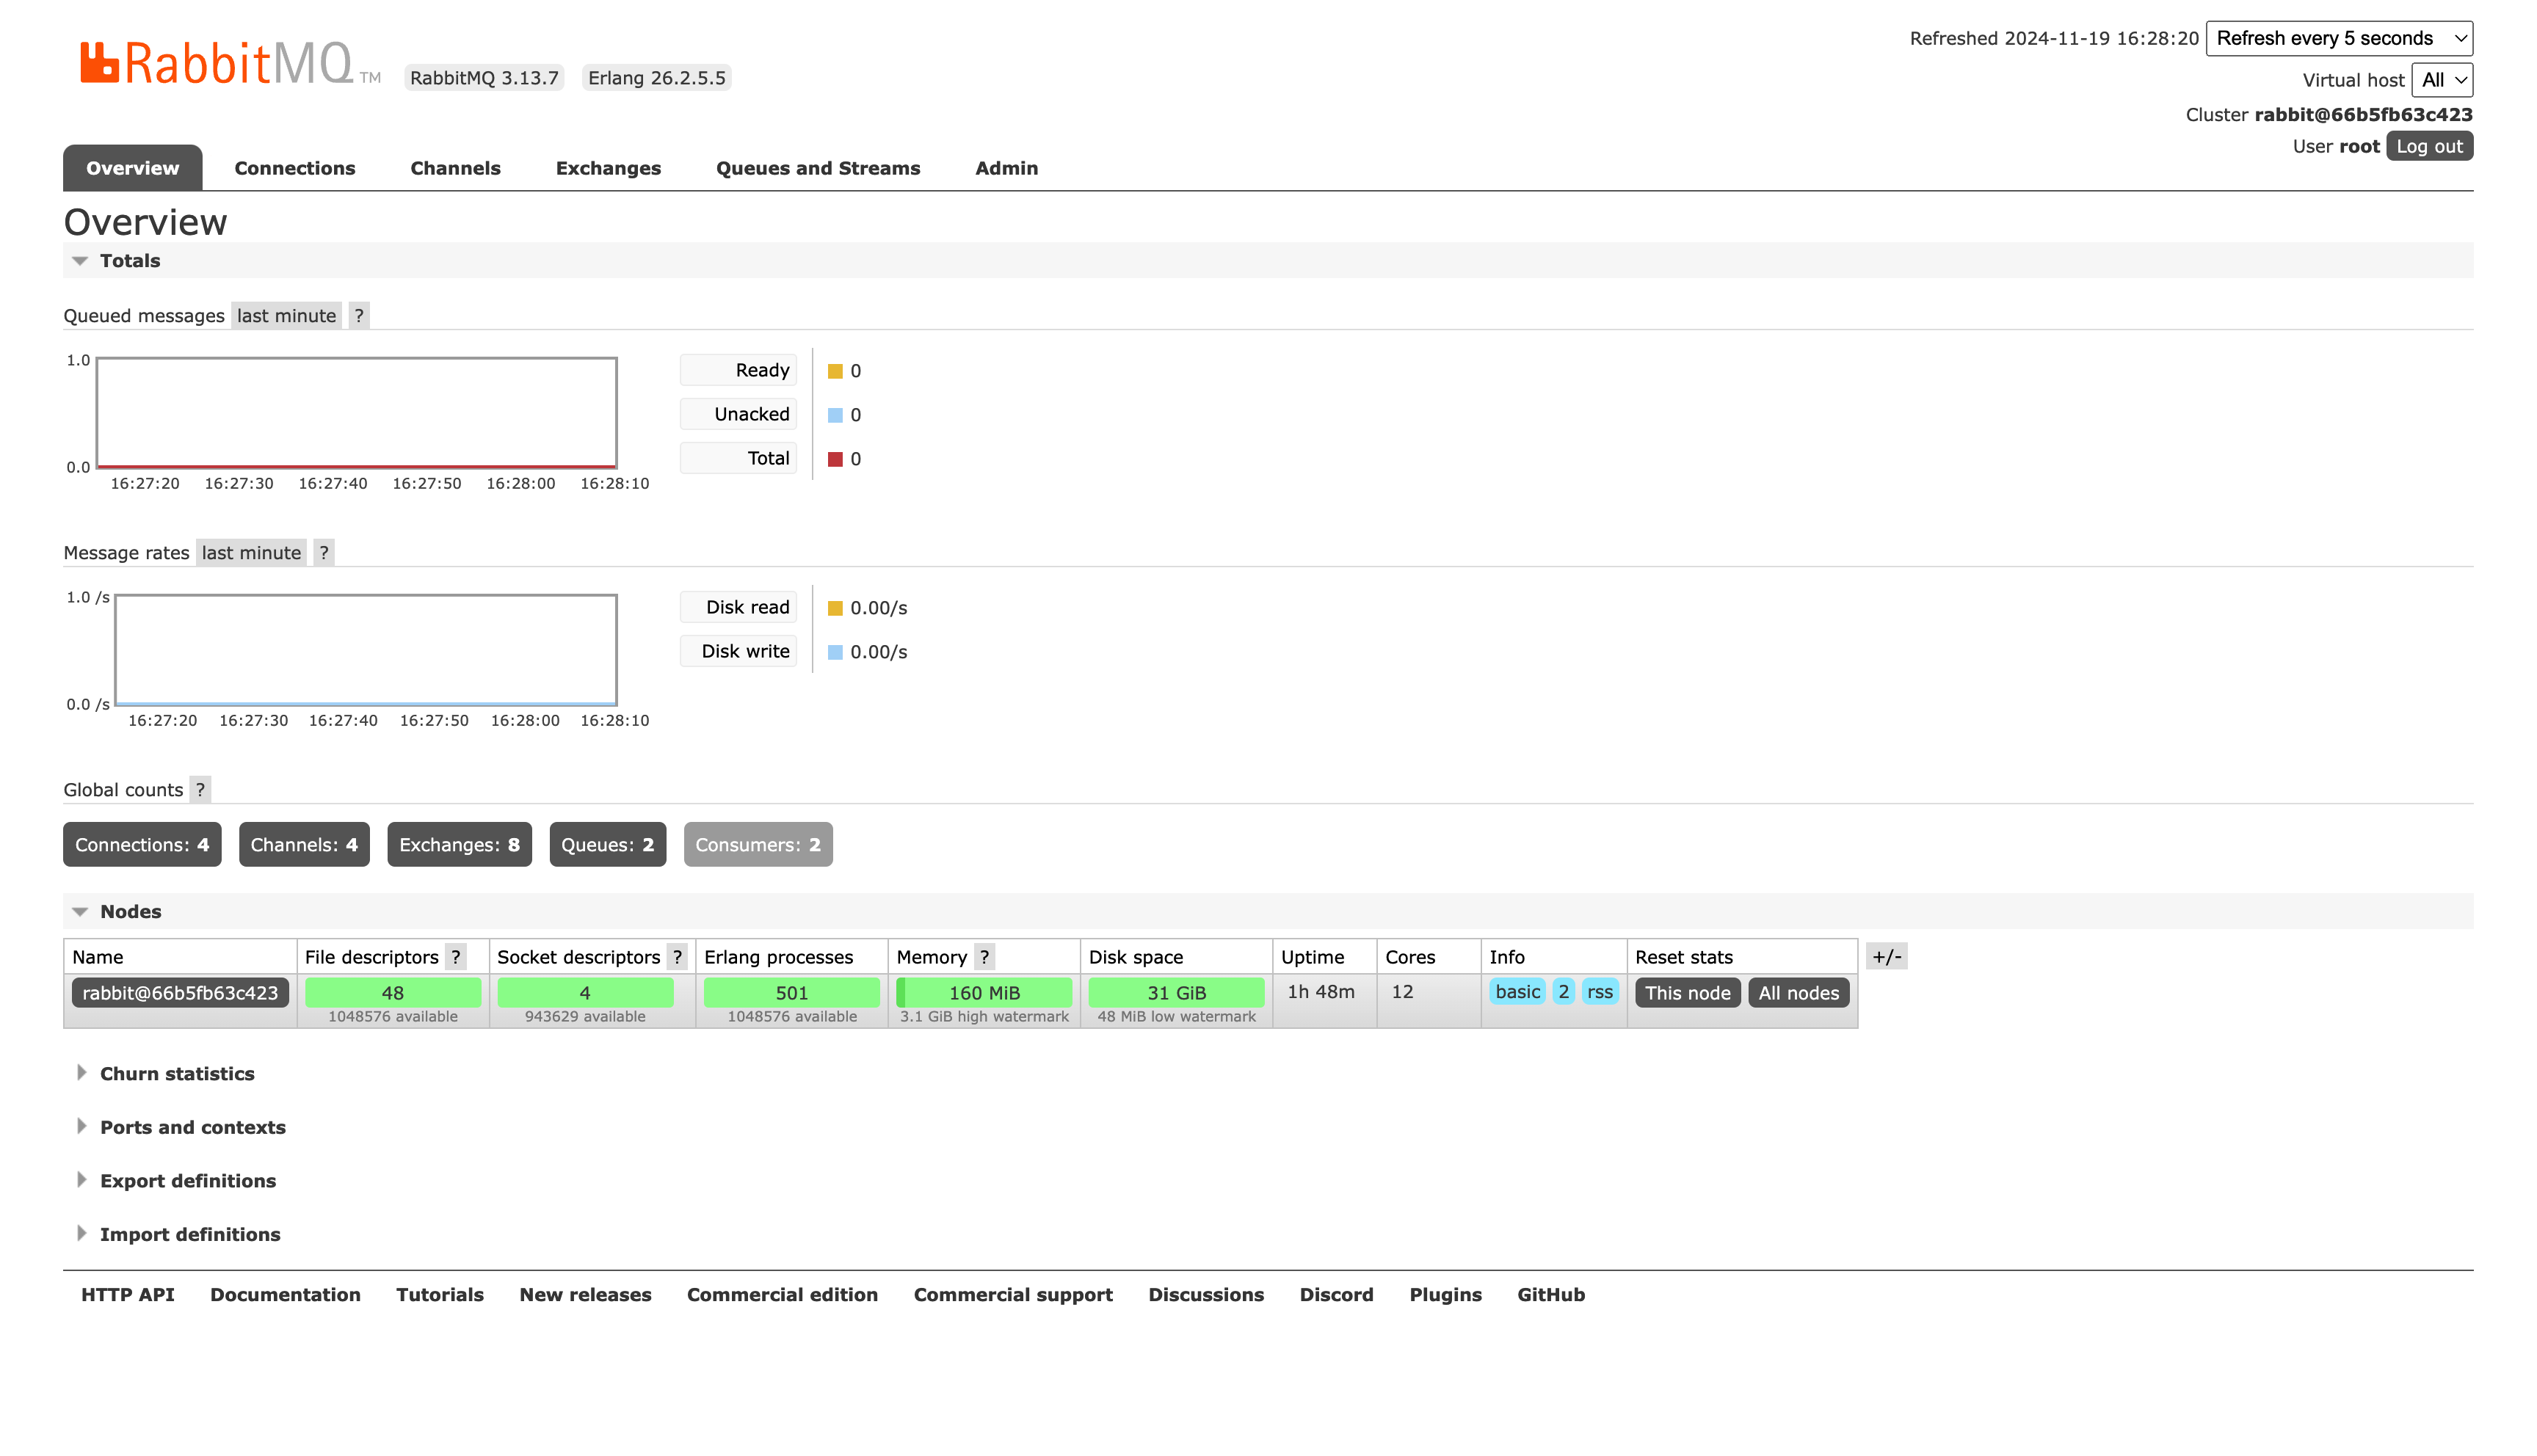
Then, visit http://localhost:15672/ to open the management platform.
Starting ELK Docker Container
The ELK Stack is a powerful suite of open-source tools designed for searching, analyzing, and visualizing log data in real-time. It consists of three main components: Elasticsearch, a search and analytics engine; Logstash, a data processing pipeline that collects, parses, and stores logs; and Kibana, a visualization tool that allows users to explore and interact with data stored in Elasticsearch. Together, these tools provide a robust solution for managing and analyzing large volumes of log data from various sources, making it easier to monitor and troubleshoot applications and infrastructure.
First, create `logstash/pipeline/logstash.conf` and add the configuration as follows:
input {
  beats {
    port => 5000
  }
}
filter {
  # Add your filters here
}
output {
  elasticsearch {
    hosts => ["elasticsearch:9200"]
    index => "%{[@metadata][beat]}-%{+YYYY.MM.dd}"
  }
  stdout { codec => rubydebug }
}
Then, run the follows `docker-compose.yaml` file via `docker compose up -d`:
services:
  elasticsearch:
    image: docker.elastic.co/elasticsearch/elasticsearch:8.16.0
    container_name: elasticsearch
    restart: 'always'
    environment:
      - discovery.type=single-node
      - xpack.security.enabled=false
      - bootstrap.memory_lock=true
      - "ES_JAVA_OPTS=-Xms512m -Xmx512m"
    ulimits:
      memlock:
        soft: -1
        hard: -1
    volumes:
      - esdata:/usr/share/elasticsearch/data
    ports:
      - "9200:9200"
      - "9300:9300"
    networks:
      - elk
  logstash:
    image: docker.elastic.co/logstash/logstash:8.16.0
    container_name: logstash
    restart: 'always'
    volumes:
      - ./logstash/pipeline:/usr/share/logstash/pipeline
    ports:
      - "5044:5044"
      - "9600:9600"
    networks:
      - elk
    depends_on:
      - elasticsearch
  kibana:
    image: docker.elastic.co/kibana/kibana:8.16.0
    container_name: kibana
    restart: 'always'
    environment:
      - ELASTICSEARCH_URL=http://elasticsearch:9200
    ports:
      - "5601:5601"
    networks:
      - elk
    depends_on:
      - elasticsearch
networks:
  elk:
    driver: bridge
volumes:
  esdata:
    driver: local
Nest.js Microservice
Instantiating a microservice is as straightforward as setting up a normal HTTP service. Simply follow the Nest.js Microservices instructions. In this case, we also integrateELK and RabbitMQ.
apps/product/main.ts
There are two important points to note:
- If
`product.proto`imports other`.proto`files, such as`common.proto`, you must also include the`common.proto`file. There are two ways to address this:
Option 1: Directly import `common.proto` into the `protoPath`:
protoPath: [join(process.cwd(), 'proto/product.proto'), join(process.cwd(), 'proto/common.proto')],
Option 2: Load the entire `proto` directory.
loader: {
  includeDirs: [process.cwd(), 'proto']
}
- Configure the service to listen on
`0.0.0.0:10087`instead of`localhost:10087`. This is because each Kubernetes Pod operates within its own network namespace, and`localhost`just refers to the Pod’s loopback address. Other Pods cannot communicate with it using`localhost`.
import { ecsFormat } from '@elastic/ecs-winston-format'
import { NestFactory } from '@nestjs/core'
import { MicroserviceOptions, Transport } from '@nestjs/microservices'
import { WinstonModule } from 'nest-winston'
import { join } from 'path'
import * as winston from 'winston'
import { ElasticsearchTransport } from 'winston-elasticsearch'
import { ProductModule } from './product.module'
// Using winston and ELK instead of the official logger
export const logger = WinstonModule.createLogger({
  instance: winston.createLogger({
    level: 'info',
    format: ecsFormat(),
    transports: [
      new ElasticsearchTransport({
        level: 'info',
        indexPrefix: 'learn-backend-logging', // Remember this line and we'll use it to config Kibana Data View
        indexSuffixPattern: 'YYYY-MM-DD',
        clientOpts: {
          node: 'http://0.0.0.0:9200',
          maxRetries: 5,
          requestTimeout: 10000,
          sniffOnStart: false,
          tls: { rejectUnauthorized: false }
        }
      })
    ]
  })
})
async function bootstrap() {
  const app = await NestFactory.createMicroservice<MicroserviceOptions>(
    ProductModule,
    {
      transport: Transport.GRPC,
      options: {
        package: 'product',
        protoPath: join(process.cwd(), 'proto/product.proto'),
        url: '0.0.0.0:10087'
      },
      logger
    }
  )
  await app.listen()
}
bootstrap()
apps/product/product.module.ts
import { ConfigModule } from '@app/config'
import { RabbitMQModule } from '@golevelup/nestjs-rabbitmq'
import { Logger, Module } from '@nestjs/common'
import { ProductController } from './product.controller'
import { ProductService } from './product.service'
@Module({
  imports: [
    ConfigModule,
    RabbitMQModule.forRoot(RabbitMQModule, {
      exchanges: [{ name: 'MQ_SERVICE', type: 'topic' }],
      uri: 'amqp://root:[email protected]:5672',
      connectionInitOptions: { wait: false },
      deserializer: (message: Buffer) => {
        return message
      },
      serializer: (msg: unknown) => {
        const encodedMessage = JSON.stringify(msg)
        return Buffer.from(encodedMessage)
      }
    })
  ],
  controllers: [ProductController],
  providers: [ProductService, Logger]
})
export class ProductModule {}
apps/product/product.controller.ts
After running the `pnpm run proto-ts` command, you will generate the `ProductServiceController` interface. You can implement it and create the template code as follows:
import { AmqpConnection, RabbitSubscribe } from '@golevelup/nestjs-rabbitmq'
import { Controller, Logger } from '@nestjs/common'
import { GrpcMethod } from '@nestjs/microservices'
import { Observable } from 'rxjs'
import {
  CreateProductRequest,
  CreateProductResponse,
  DeleteProductRequest,
  DeleteProductResponse,
  GetProductRequest,
  GetProductResponse,
  ProductServiceController,
  UpdateProductRequest,
  UpdateProductResponse
} from 'types/proto/product'
@Controller()
export class ProductController implements ProductServiceController {
  constructor(private readonly logger: Logger, private readonly amqpConnection: AmqpConnection,) {}
  @GrpcMethod('ProductService', 'CreateProduct')
  createProduct(
    request: CreateProductRequest
  ): Promise<CreateProductResponse> | CreateProductResponse {
     throw new Error('Method not implemented.')
  }
  @GrpcMethod('ProductService', 'GetProduct')
  getProduct(
    request: GetProductRequest
  ):
    | Promise<GetProductResponse>
    | Observable<GetProductResponse>
    | GetProductResponse {
    // record log to elasticsearch
    this.logger.log('call getProduct rpc')
    // publish rabbitmq message
    this.amqpConnection.publish(
      'MQ_SERVICE',
      'get_product_by_id',
      request
    )
    return {}
  }
  updateProduct(
    request: UpdateProductRequest
  ):
    | Promise<UpdateProductResponse>
    | Observable<UpdateProductResponse>
    | UpdateProductResponse {
    throw new Error('Method not implemented.')
  }
  deleteProduct(
    request: DeleteProductRequest
  ):
    | Promise<DeleteProductResponse>
    | Observable<DeleteProductResponse>
    | DeleteProductResponse {
    throw new Error('Method not implemented.')
  }
  @RabbitSubscribe({
    exchange: 'MQ_SERVICE',
    routingKey: 'get_product_by_id'
  })
  public async subscribe(content: Buffer, msg: unknown) {
    const message = JSON.parse(content.toString())
    console.log(message, msg)
  }
}
Nest.js Gateway
The Gateway service is simply a HTTP service, we want to use it call Product microservice service and expose the APIs.
apps/gateway/main.ts
import { NestFactory } from '@nestjs/core'
import { GatewayModule } from './gateway.module'
async function bootstrap() {
  const app = await NestFactory.create(GatewayModule)
  await app.listen(10086)
}
bootstrap()
apps/gateway/gateway.module.ts
To call the Product microservice, you need to register it at first.
Kubernetes uses an internal `DNS name` system for service discovery. We will name the Product microservice service `product-service` at the follows chapter. In production, you can reach the Product microservice using `product-service:10087`, while in development, you just use `0.0.0.0:10087`.
import { ConfigModule } from '@app/config'
import { Logger, Module } from '@nestjs/common'
import { ClientsModule, Transport } from '@nestjs/microservices'
import { join } from 'path'
import { GatewayController } from './gateway.controller'
@Module({
  imports: [
    ClientsModule.register([
      {
        name: 'ORDER_SERVICE',
        transport: Transport.GRPC,
        options: {
          url:
            process.env.NODE_ENV === 'production'
              ? 'product-service:10087' // For Kubernetes production environment
              : '0.0.0.0:10087', // For local development environment
          package: 'product',
          protoPath: join(process.cwd(), 'proto/product.proto'),
          loader: {
            includeDirs: [process.cwd(), 'proto']
          }
        }
      }
    ]),
  ],
  providers: [GatewayController]
})
export class GatewayModule {}
apps/gateway/gateway.controller.ts
import { Metadata } from '@grpc/grpc-js'
import {
  Controller,
  Get,
  Inject,
  Logger,
  OnModuleInit,
  Param
} from '@nestjs/common'
import { ClientGrpc } from '@nestjs/microservices'
import { Observable } from 'rxjs'
import {
  GetProductResponse,
  ProductServiceController
} from 'types/proto/product'
@Controller()
export class GatewayController implements OnModuleInit {
  private productService: ProductServiceController
  constructor(@Inject('PRODUCT_SERVICE') private productClient: ClientGrpc) {}
  onModuleInit() {
    this.productService =
      this.productClient.getService<ProductServiceController>('ProductService')
  }
  @Get(':id')
  getProduct(
    @Param('id') id: string
  ):
    | Promise<GetProductResponse>
    | Observable<GetProductResponse>
    | GetProductResponse {
    const metadata = new Metadata()
    return this.productService.getProduct(
      {
        id
      },
      metadata
    )
  }
}
Dockerfile
With the code phrase completed, we are now writing Dockerfiles for the Gateway service and the Product service.
docker/Dockerfile.gateway
FROM node:20-alpine AS builder
WORKDIR /app
COPY package.json pnpm-lock.yaml ./
RUN npm install -g pnpm
RUN pnpm install
COPY . .
RUN pnpm build gateway
FROM node:20-alpine AS runner
WORKDIR /app
COPY --from=builder /app/dist/apps/gateway ./dist
COPY --from=builder /app/node_modules ./node_modules
COPY package.json .
COPY proto ./proto
ENV NODE_ENV=production
EXPOSE 10086
CMD ["node", "dist/main"]
docker/Dockerfile.product
FROM node:20-alpine AS builder
WORKDIR /app
COPY package.json pnpm-lock.yaml ./
RUN npm install -g pnpm
RUN pnpm install
COPY . .
RUN pnpm build product
FROM node:20-alpine AS runner
WORKDIR /app
COPY --from=builder /app/dist/apps/product ./dist
COPY --from=builder /app/node_modules ./node_modules
COPY package.json .
COPY proto ./proto
ENV NODE_ENV=production
EXPOSE 10087
CMD ["node", "dist/main"]
Finally, run the follows commands in the root path:
docker build -t commerce/gateway-service:0.0.1 -f docker/Dockerfile.gateway .
docker build -t commerce/product-service:0.0.1 -f docker/Dockerfile.product .

Set up Kubernetes Dashboard
Firstly, install `helm` on your computer. If you are using macOS, simply run:
brew install helm
Then, install Kubernetes Dashboard package:
# Add kubernetes-dashboard repository
helm repo add kubernetes-dashboard https://kubernetes.github.io/dashboard/
# Deploy a Helm Release named "kubernetes-dashboard" using the kubernetes-dashboard chart
helm upgrade --install kubernetes-dashboard kubernetes-dashboard/kubernetes-dashboard --create-namespace --namespace kubernetes-dashboard
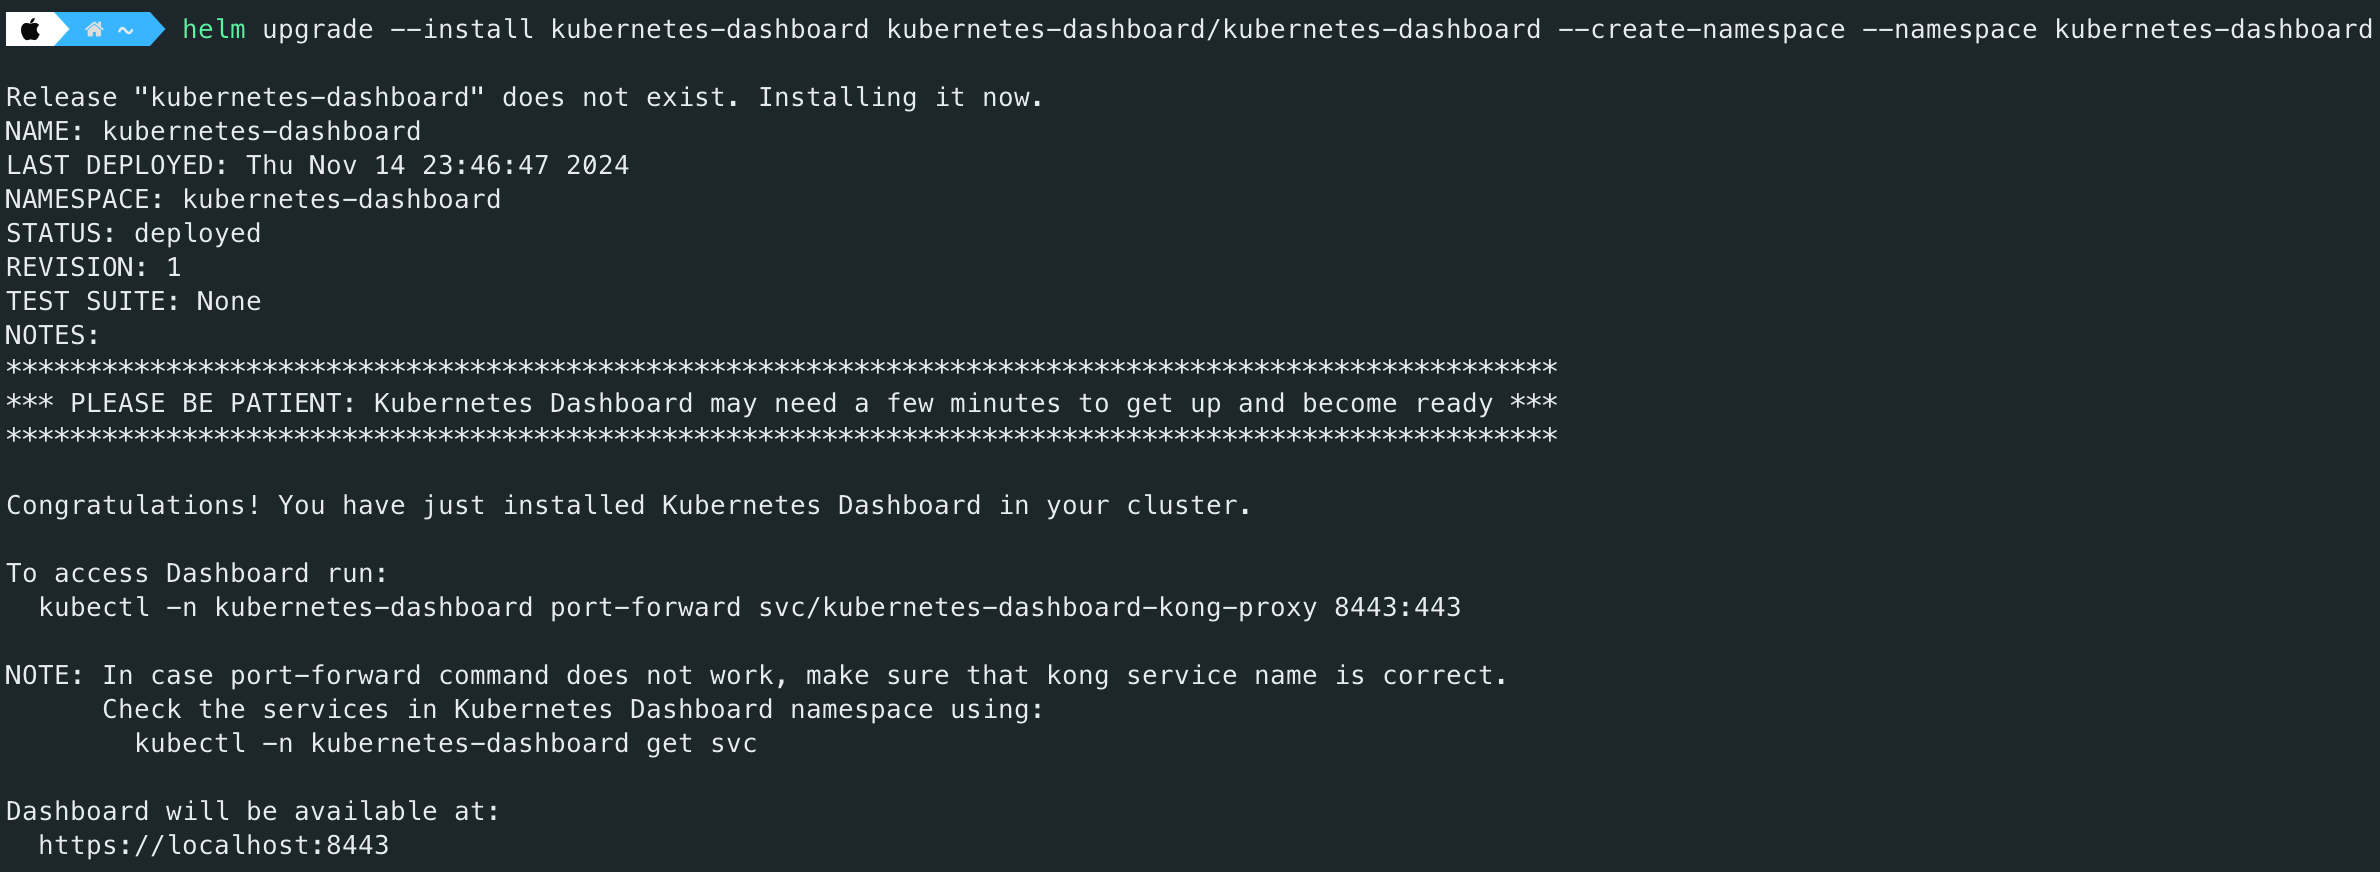
kubectl get svc -n kubernetes-dashboard

Creating Account and Token
Follow the instruction. First, create a Kubernetes manifest file to create a service account. For example:
apiVersion: v1
kind: ServiceAccount
metadata:
  name: admin-user
  namespace: kube-system
---
apiVersion: rbac.authorization.k8s.io/v1
kind: ClusterRoleBinding
metadata:
  name: admin-user
roleRef:
  apiGroup: rbac.authorization.k8s.io
  kind: ClusterRole
  name: cluster-admin
subjects:
- kind: ServiceAccount
  name: admin-user
  namespace: kube-system
Next, apply the above configuration to the Kubernetes cluster.
kubectl create -f k8s-dashboard-account.yaml
Next, generate a token using the follows command:
kubectl -n kube-system create token admin-user
Starting Kubernetes Dashboard Server
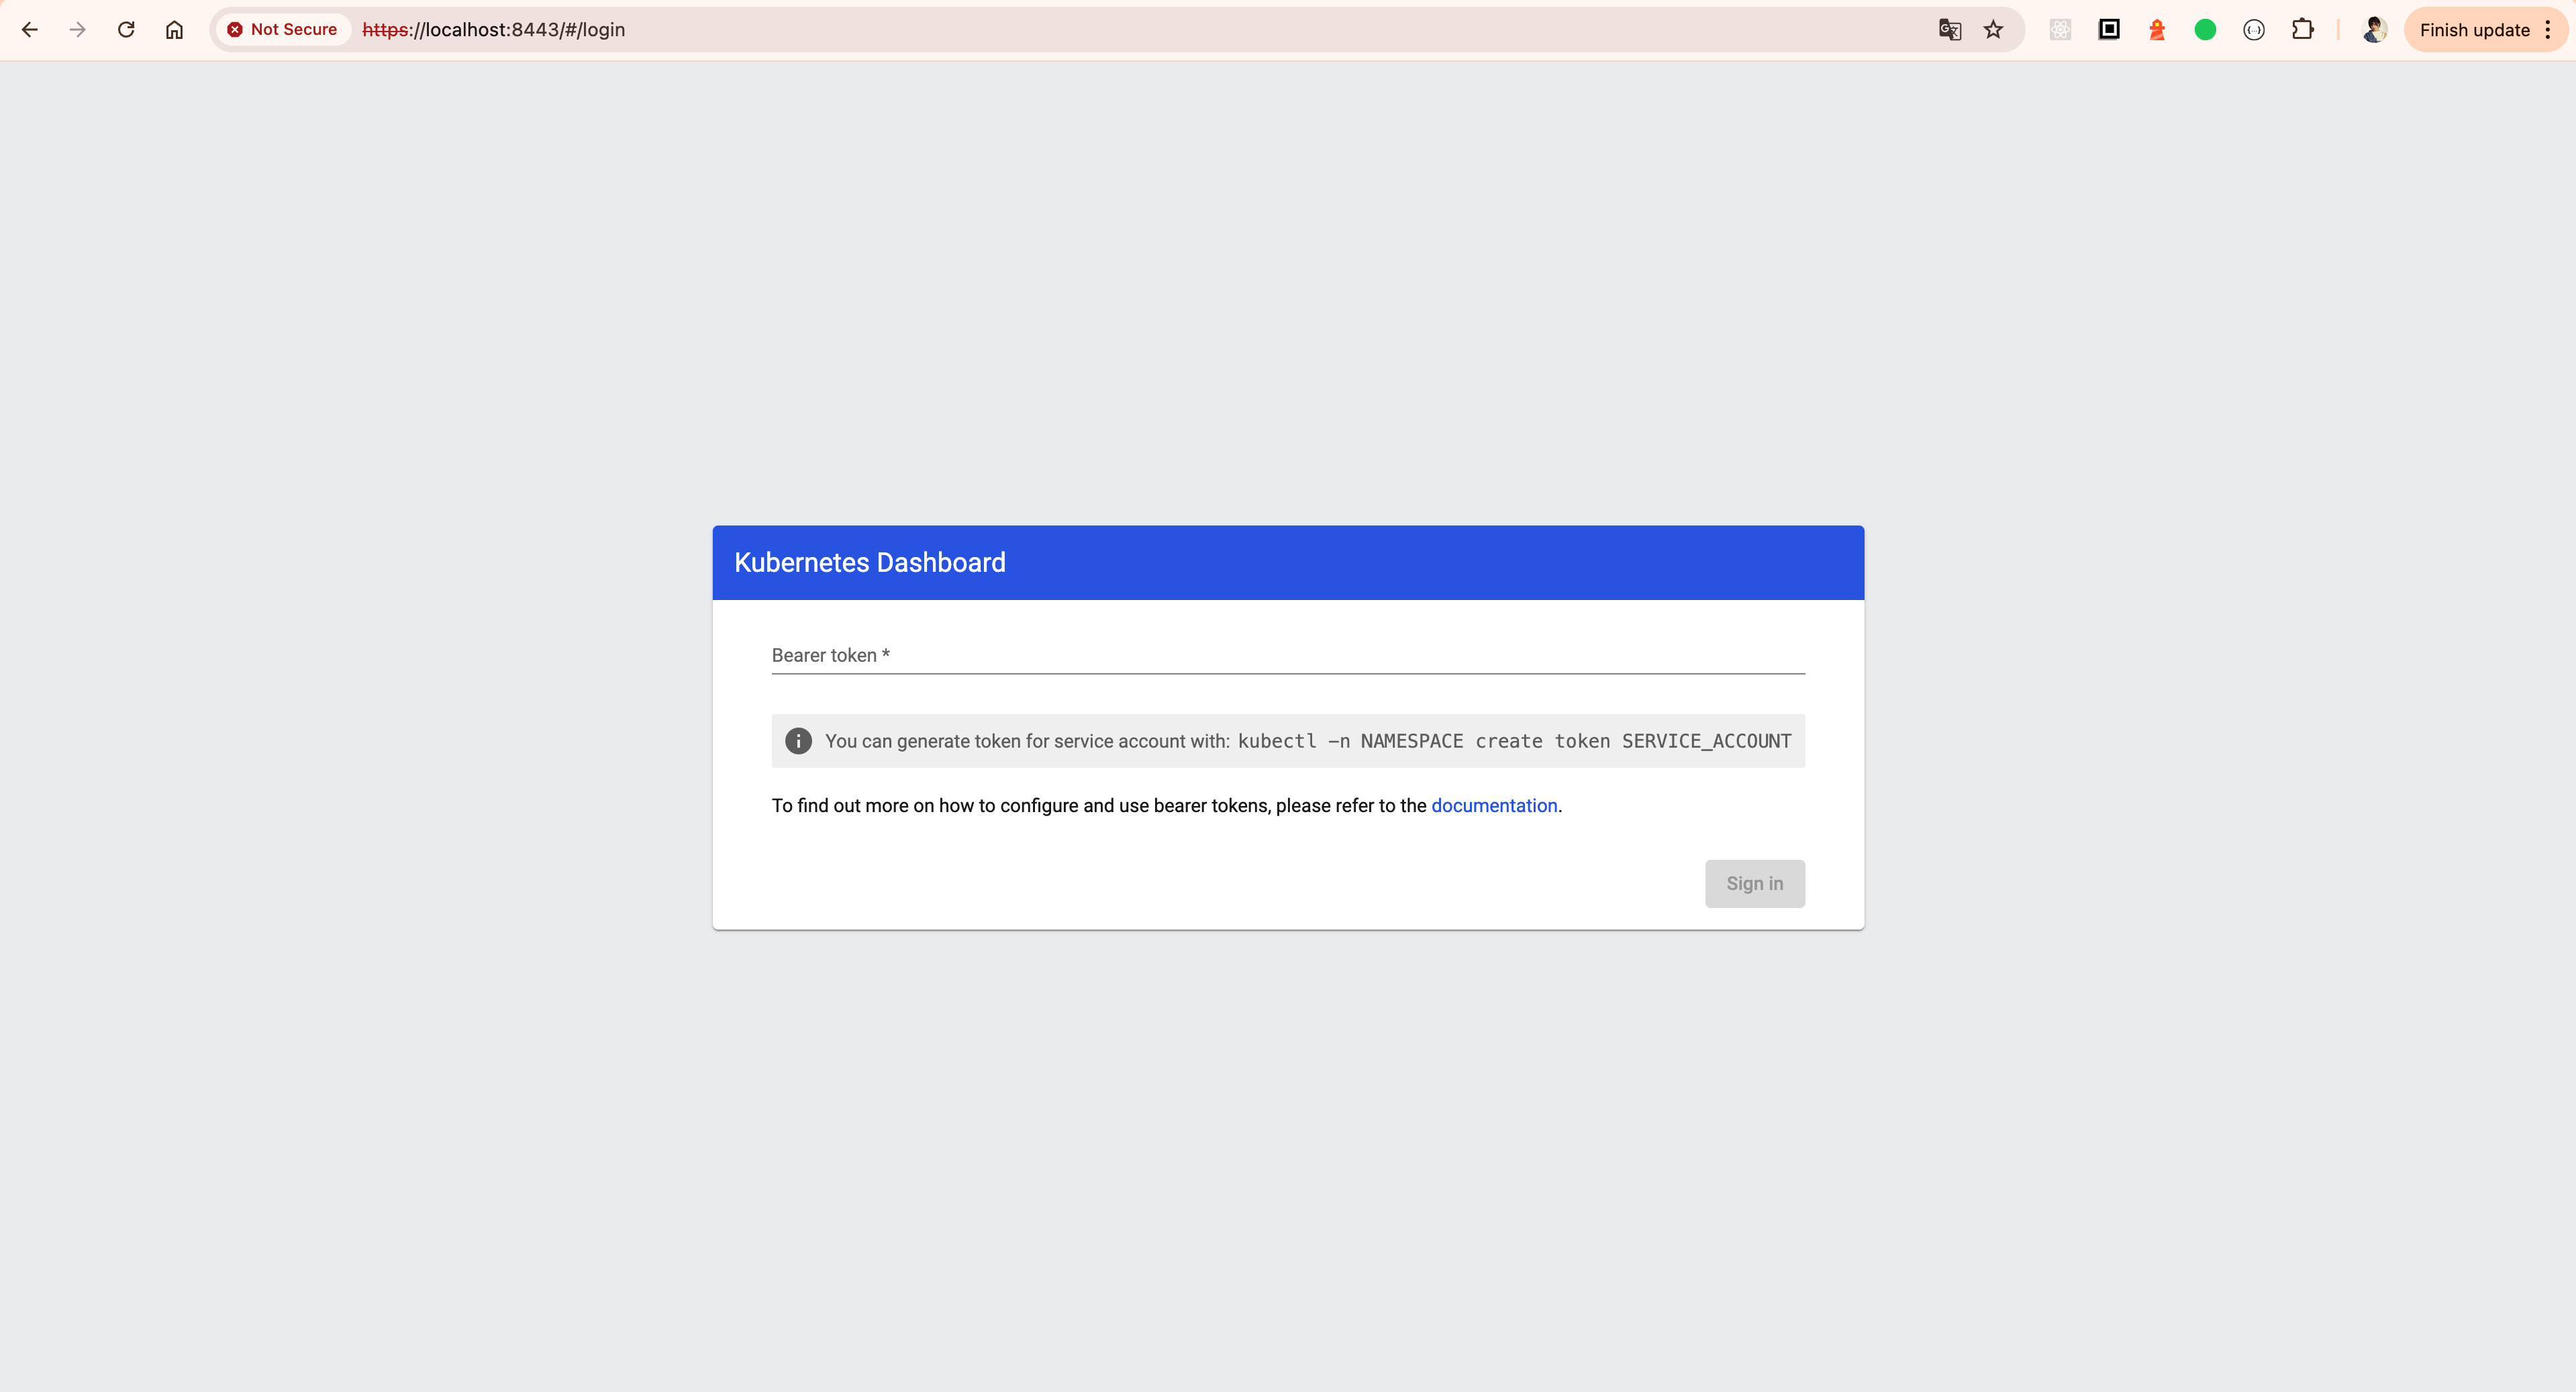
kubectl -n kubernetes-dashboard port-forward svc/kubernetes-dashboard-kong-proxy 8443:443
Finally, fill out your token on the field.
Kubernetes Deployment
k8s/gateway-deployment.yaml
apiVersion: apps/v1
kind: Deployment
metadata:
  name: gateway-deployment
spec:
  replicas: 2
  selector:
    matchLabels:
      app: gateway
  template:
    metadata:
      labels:
        app: gateway
    spec:
      containers:
        - name: gateway
          image: commerce/gateway-service:0.0.1
          ports:
            - containerPort: 10086
---
apiVersion: v1
kind: Service
metadata:
  name: gateway-service
spec:
  selector:
    app: gateway
  ports:
    - port: 10086
      targetPort: 10086
  type: LoadBalancer
k8s/product-deployment.yaml
apiVersion: apps/v1
kind: Deployment
metadata:
  name: product-deployment
spec:
  replicas: 2
  selector:
    matchLabels:
      app: product
  template:
    metadata:
      labels:
        app: product
    spec:
      containers:
        - name: product
          image: commerce/product-service:0.0.1
          ports:
            - containerPort: 10087
          env:
            - name: NODE_ENV
              value: production
---
apiVersion: v1
kind: Service
metadata:
  name: product-service
spec:
  selector:
    app: product
  ports:
    - port: 10087
      targetPort: 10087
  type: ClusterIP
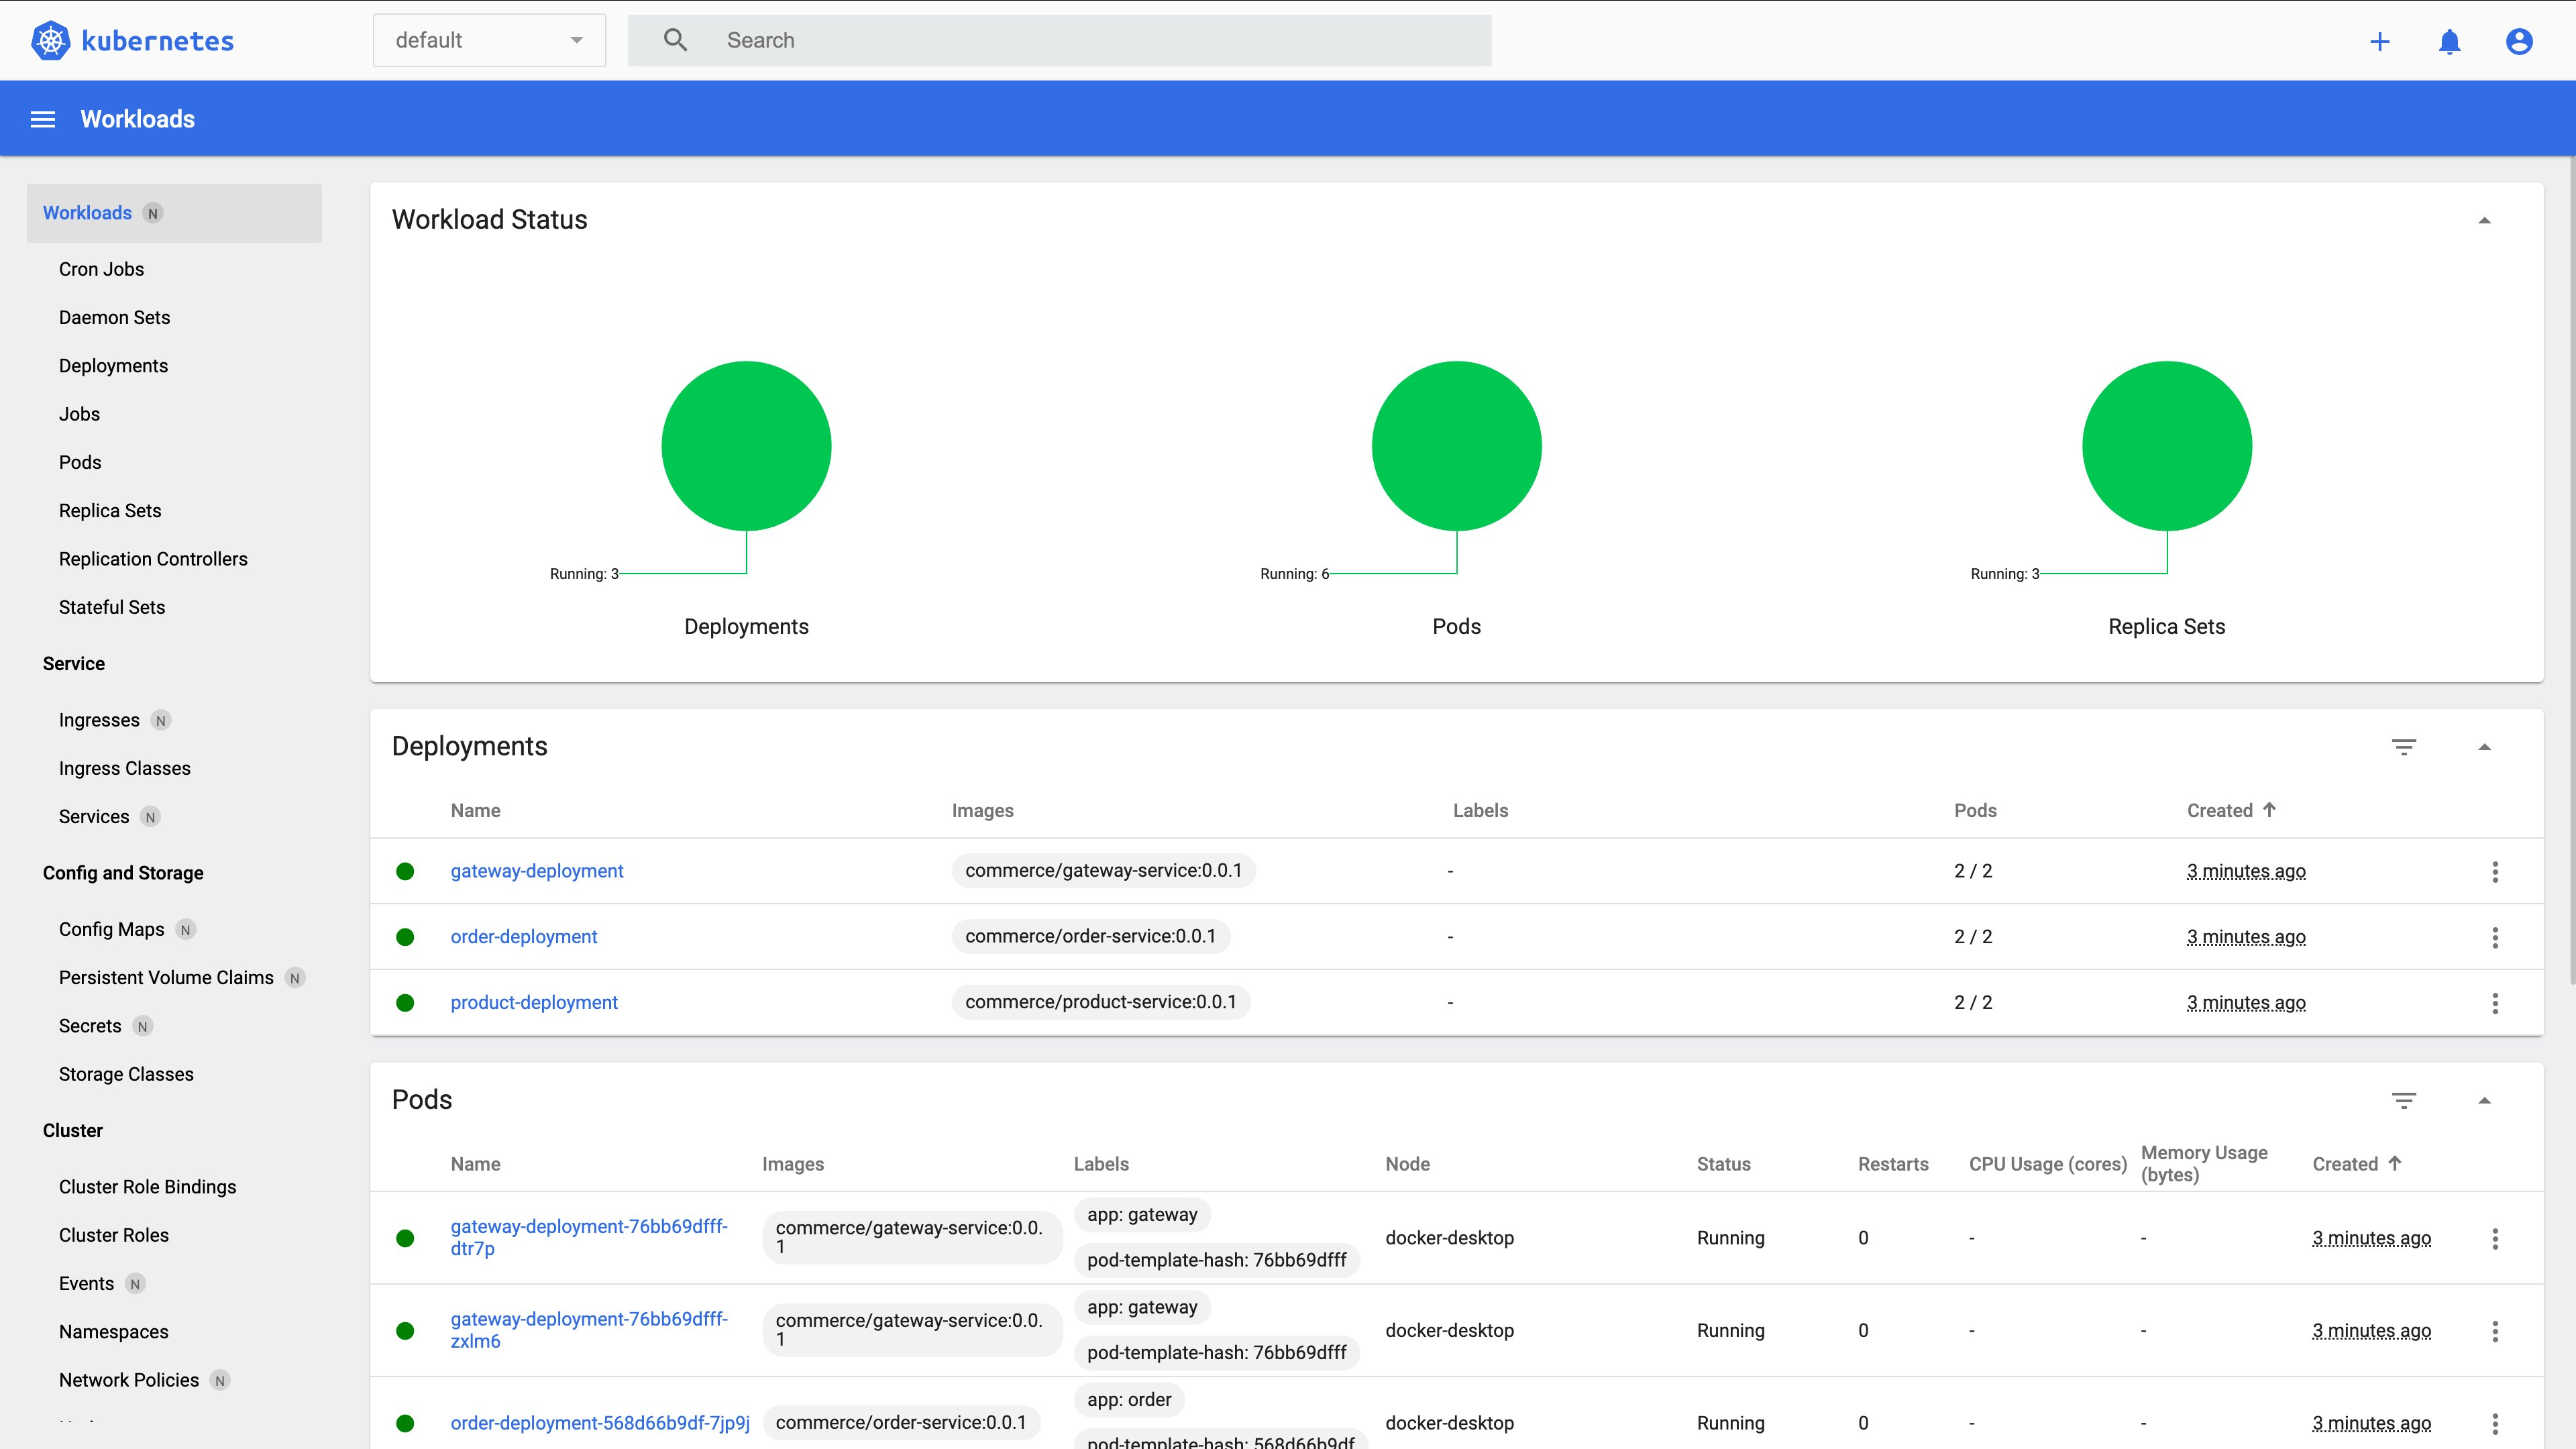
Finally, run `kubectl apply -f k8s/` to deploy your services.
Kibana Configuration
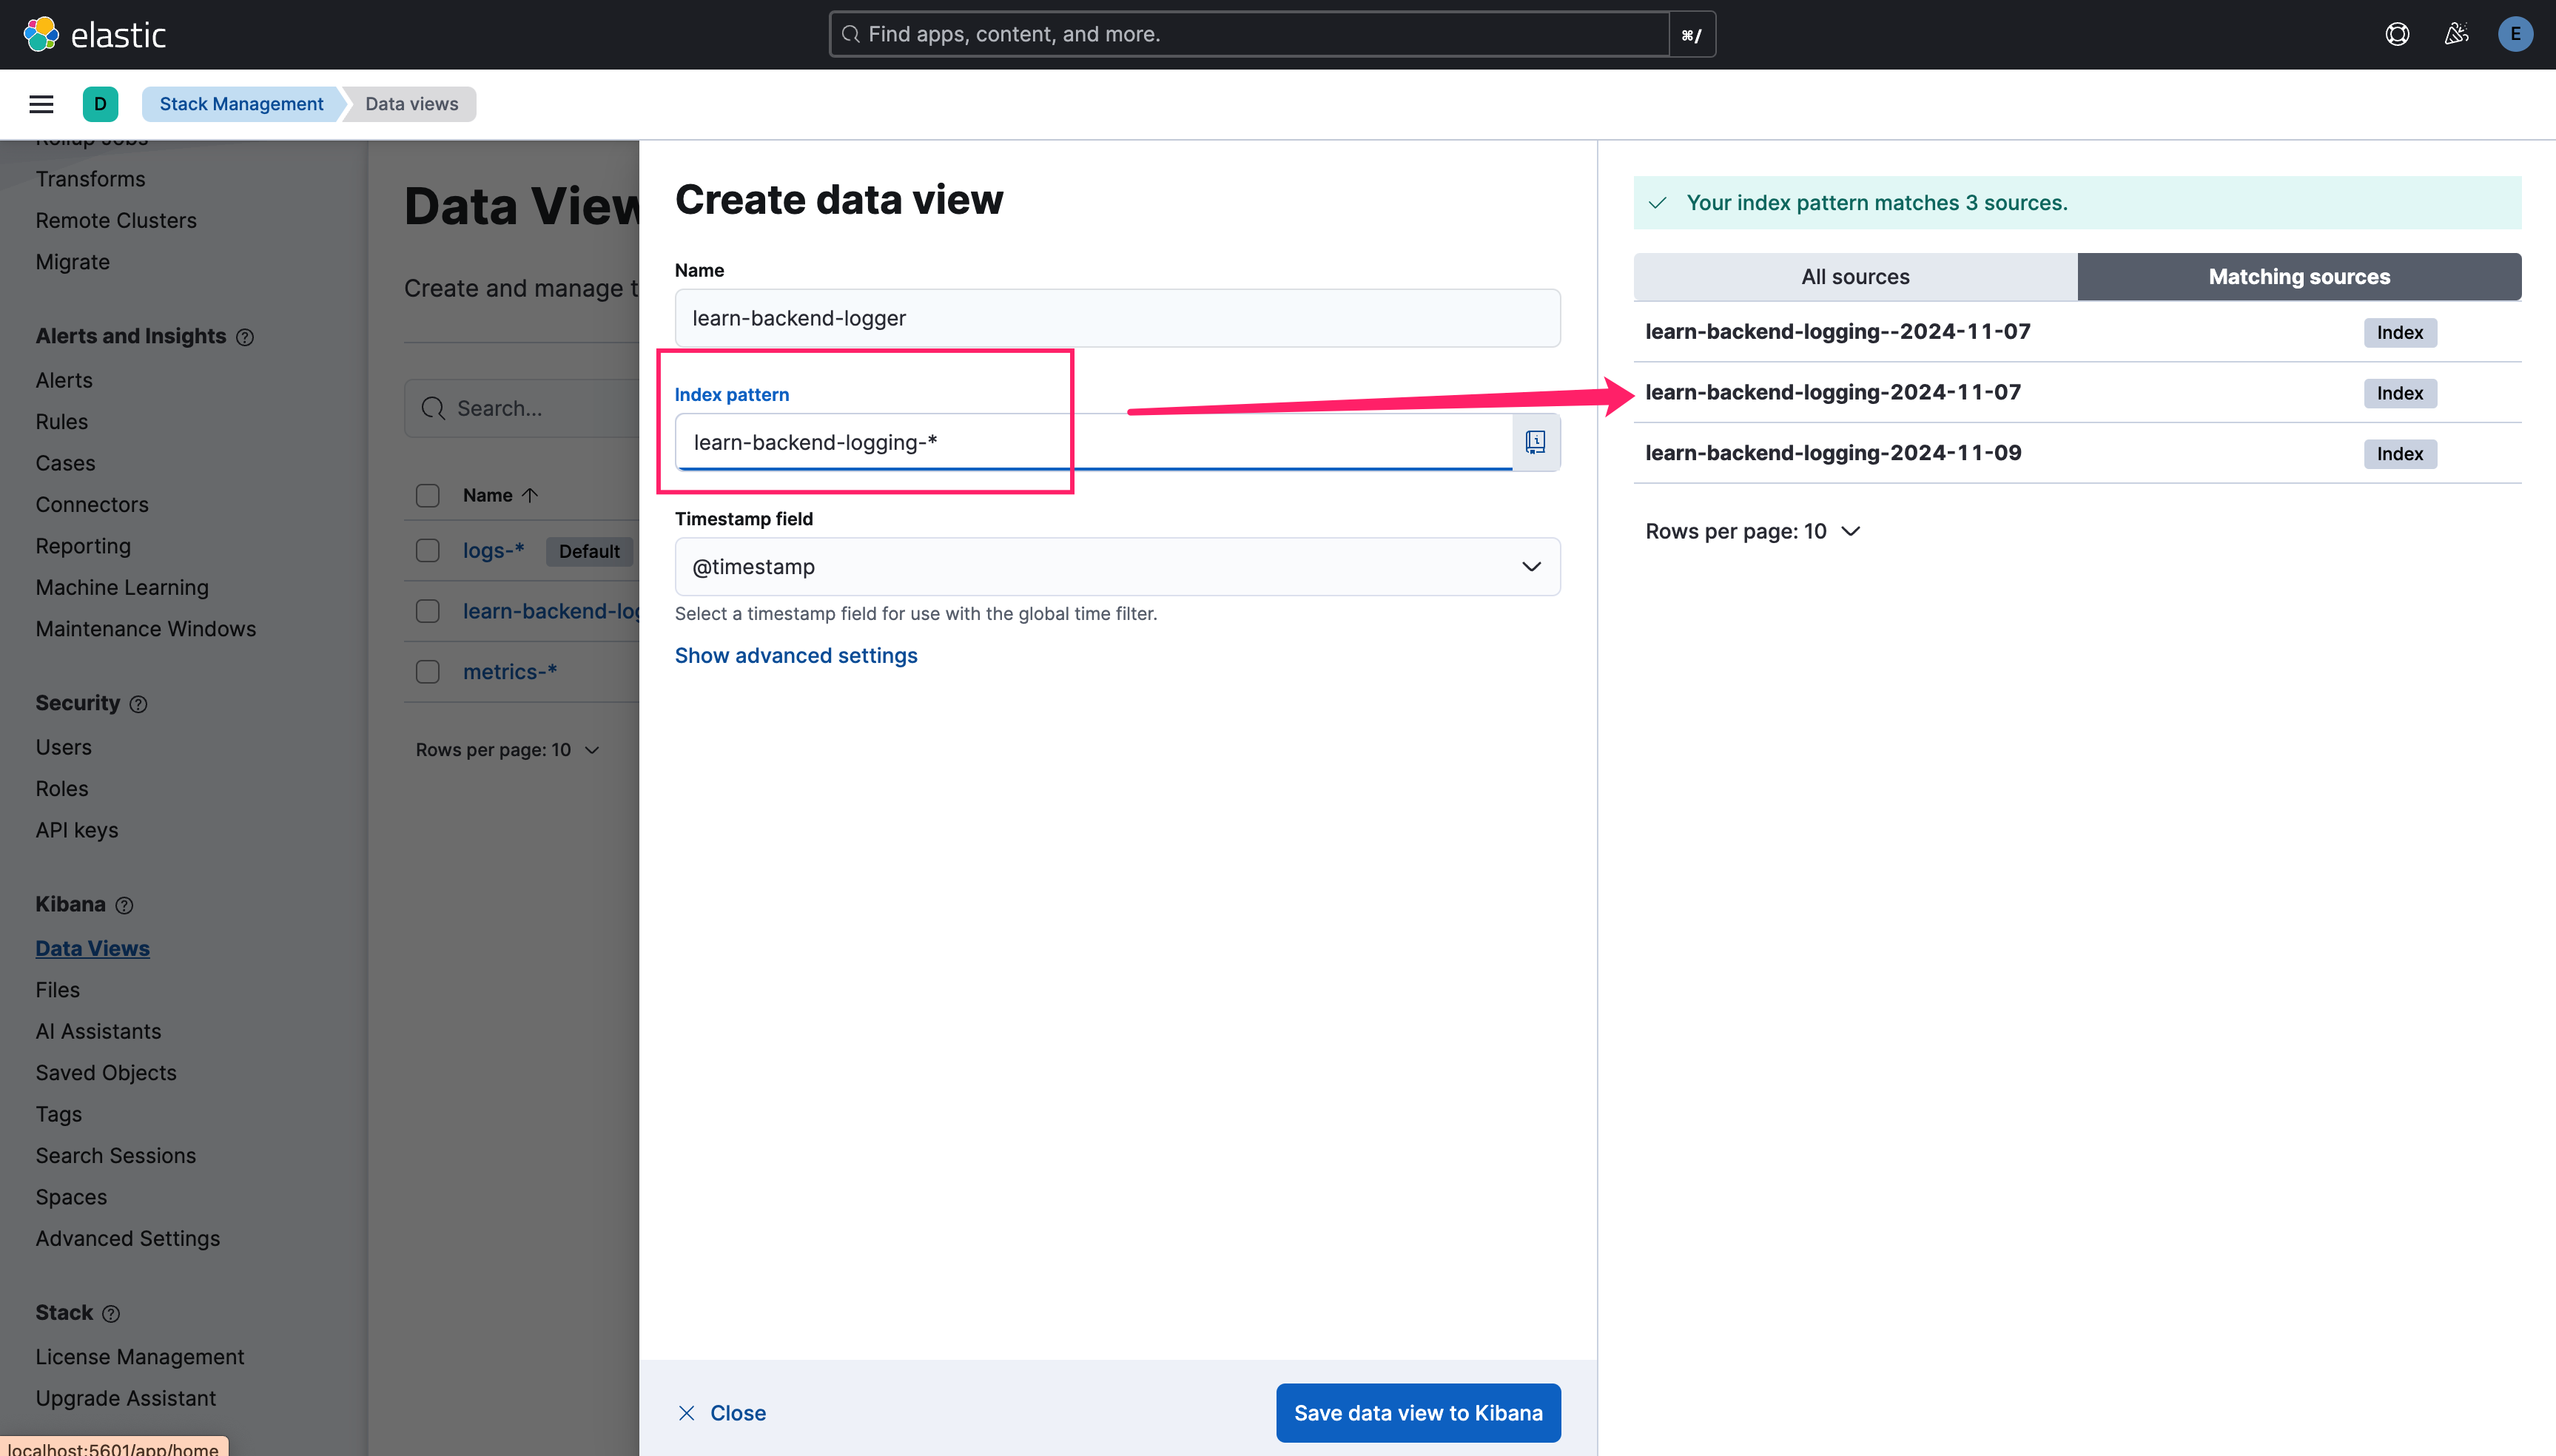
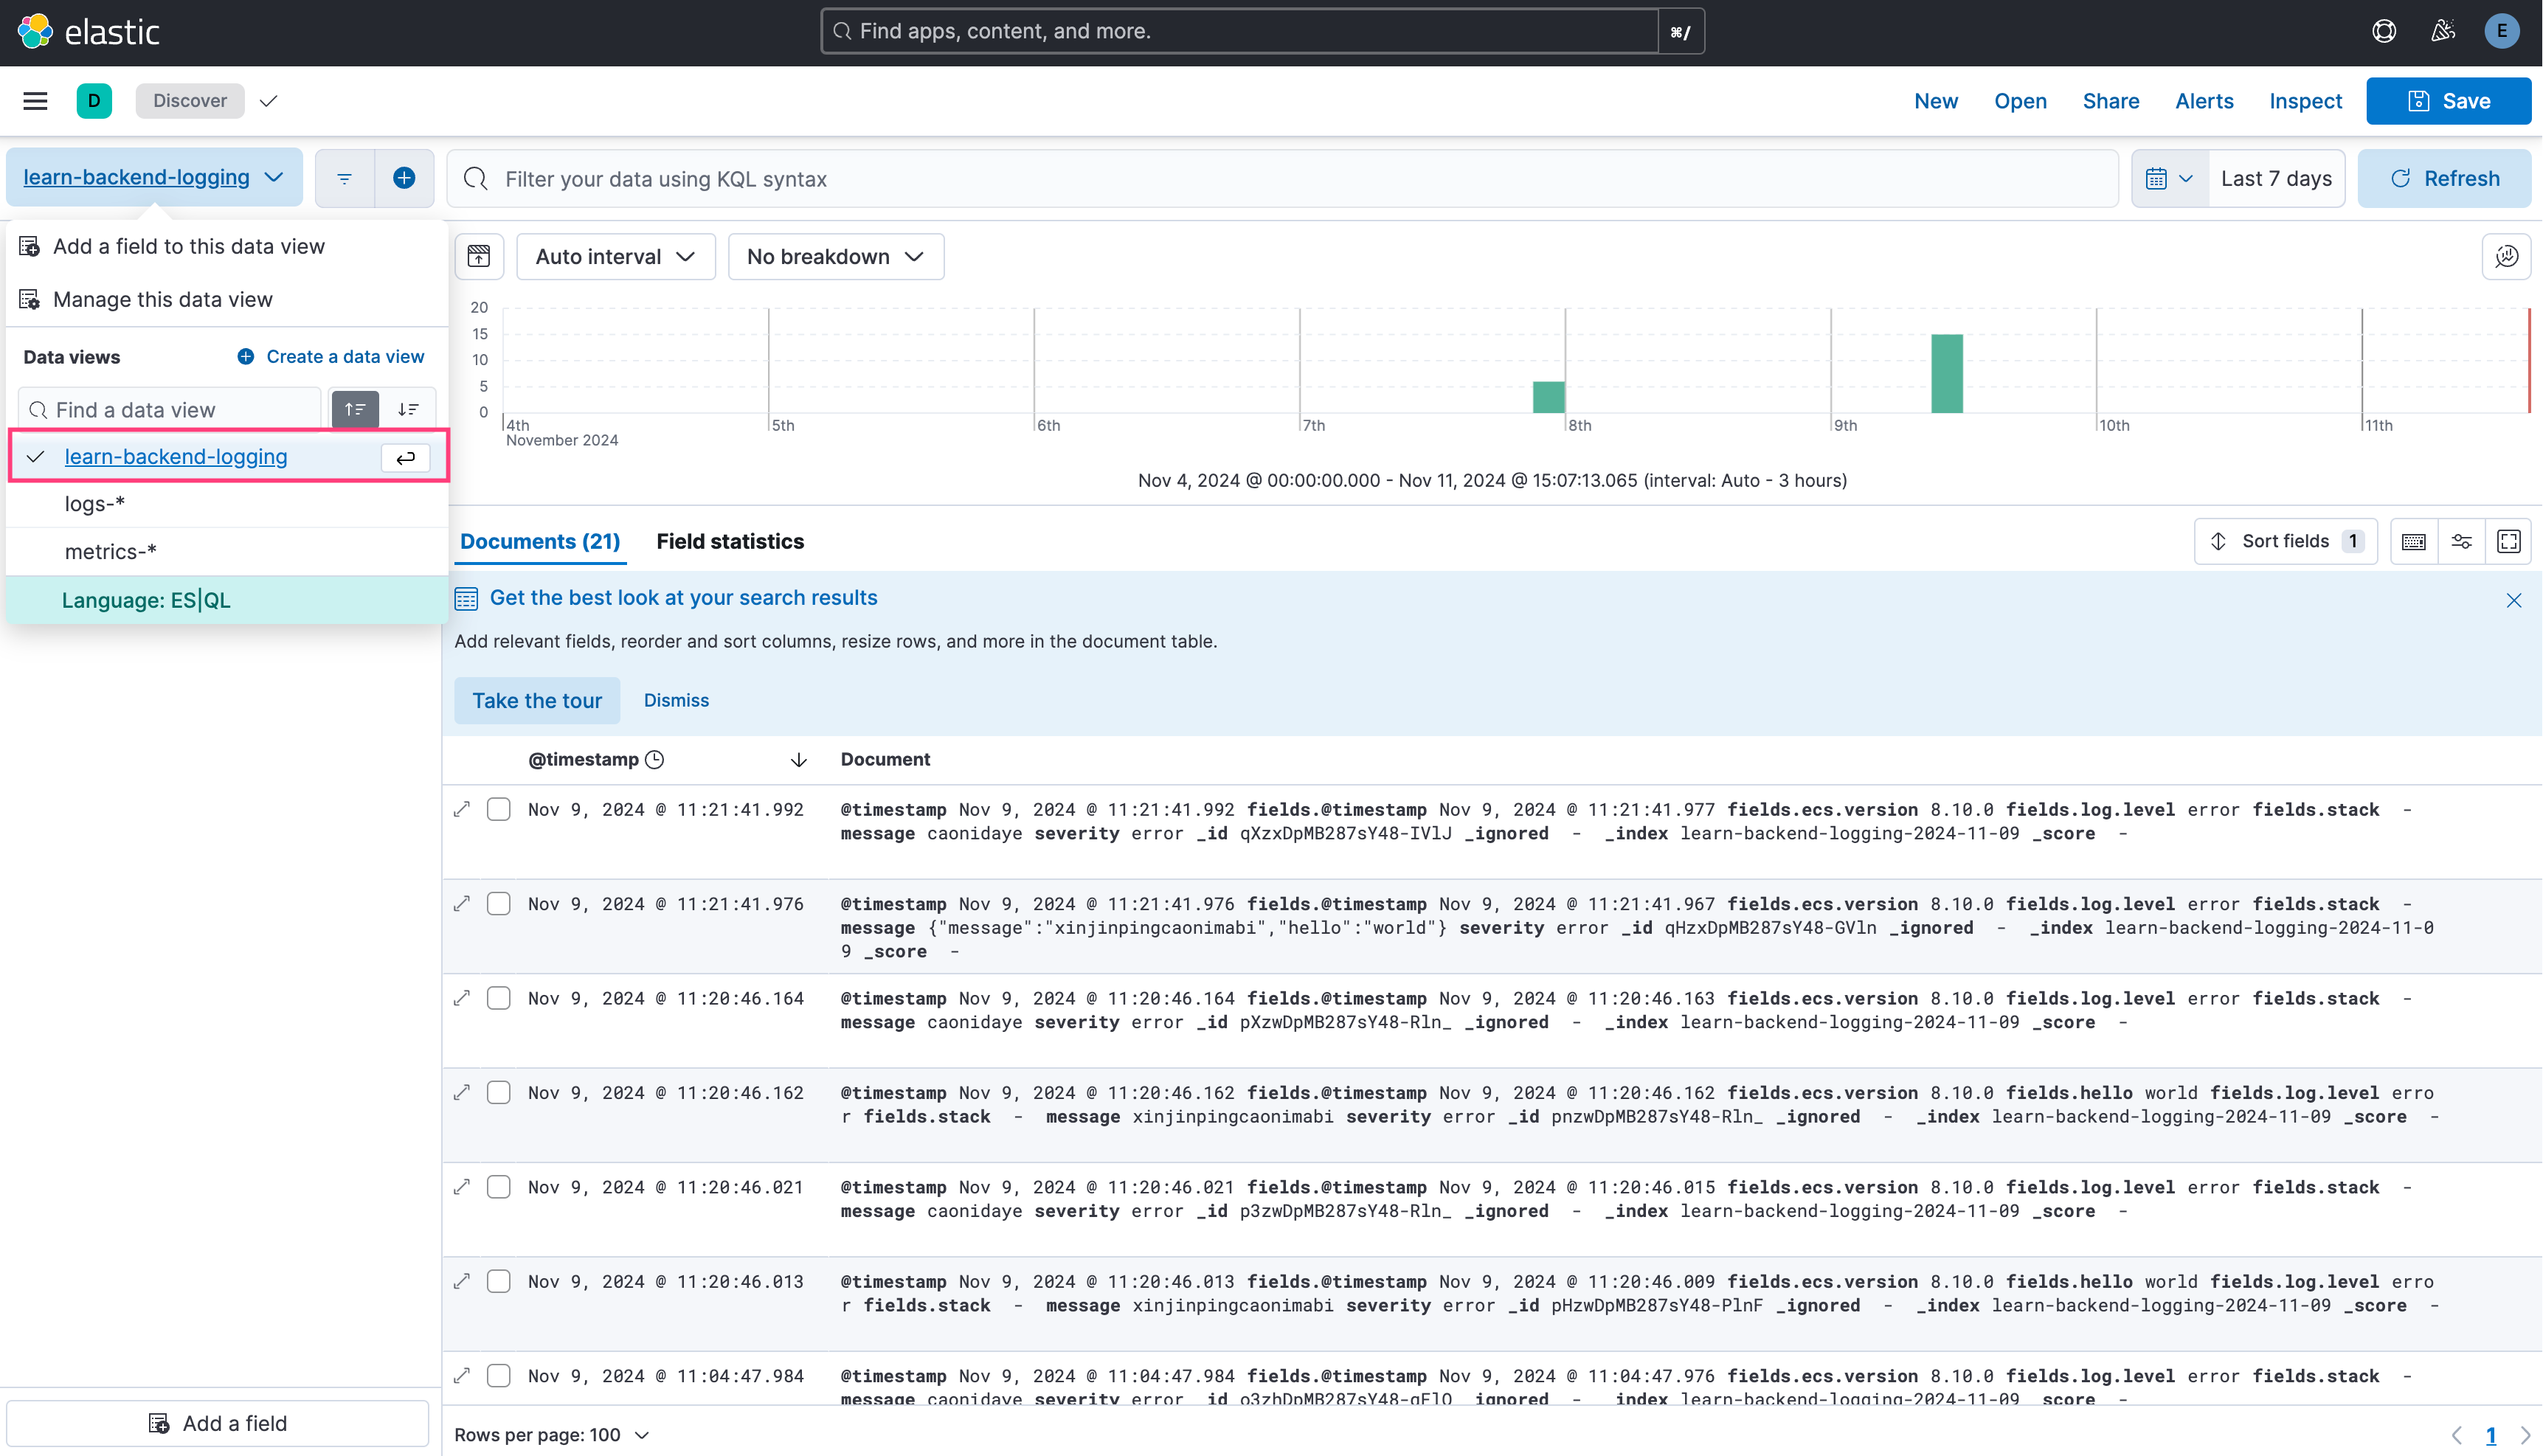
Submit some logs in advance to let ElasticSearch generate index, visit https://localhost:9200/_cat/indices?v to check whether your index successfully added.

`index pattern` matches the `indexPrefix` you configured.
Add the Prometheus Community Repository
Add and update the Helm repository:
helm repo add prometheus-community <https://prometheus-community.github.io/helm-charts>
helm repo update
Install kube-prometheus-stack
Choose a namespace (it is recommended to create a new one):
kubectl create namespace monitoring
Install the kube-prometheus-stack:
helm install kube-prometheus-stack prometheus-community/kube-prometheus-stack -n monitoring --set prometheus-node-exporter.hostRootFsMount.enabled=false
Verify Installation
Check if all related pods are running correctly:
kubectl get pods -n monitoring

kubectl get svc -n monitoring

Access Grafana
The default username is `admin`, and you can retrieve the `password` with this command:
kubectl get secret -n monitoring kube-prometheus-stack-grafana -o jsonpath="{.data.admin-password}" | base64 --decode
Expose the Grafana service (e.g., using kubectl port-forward):
kubectl port-forward -n monitoring svc/kube-prometheus-stack-grafana 9999:80
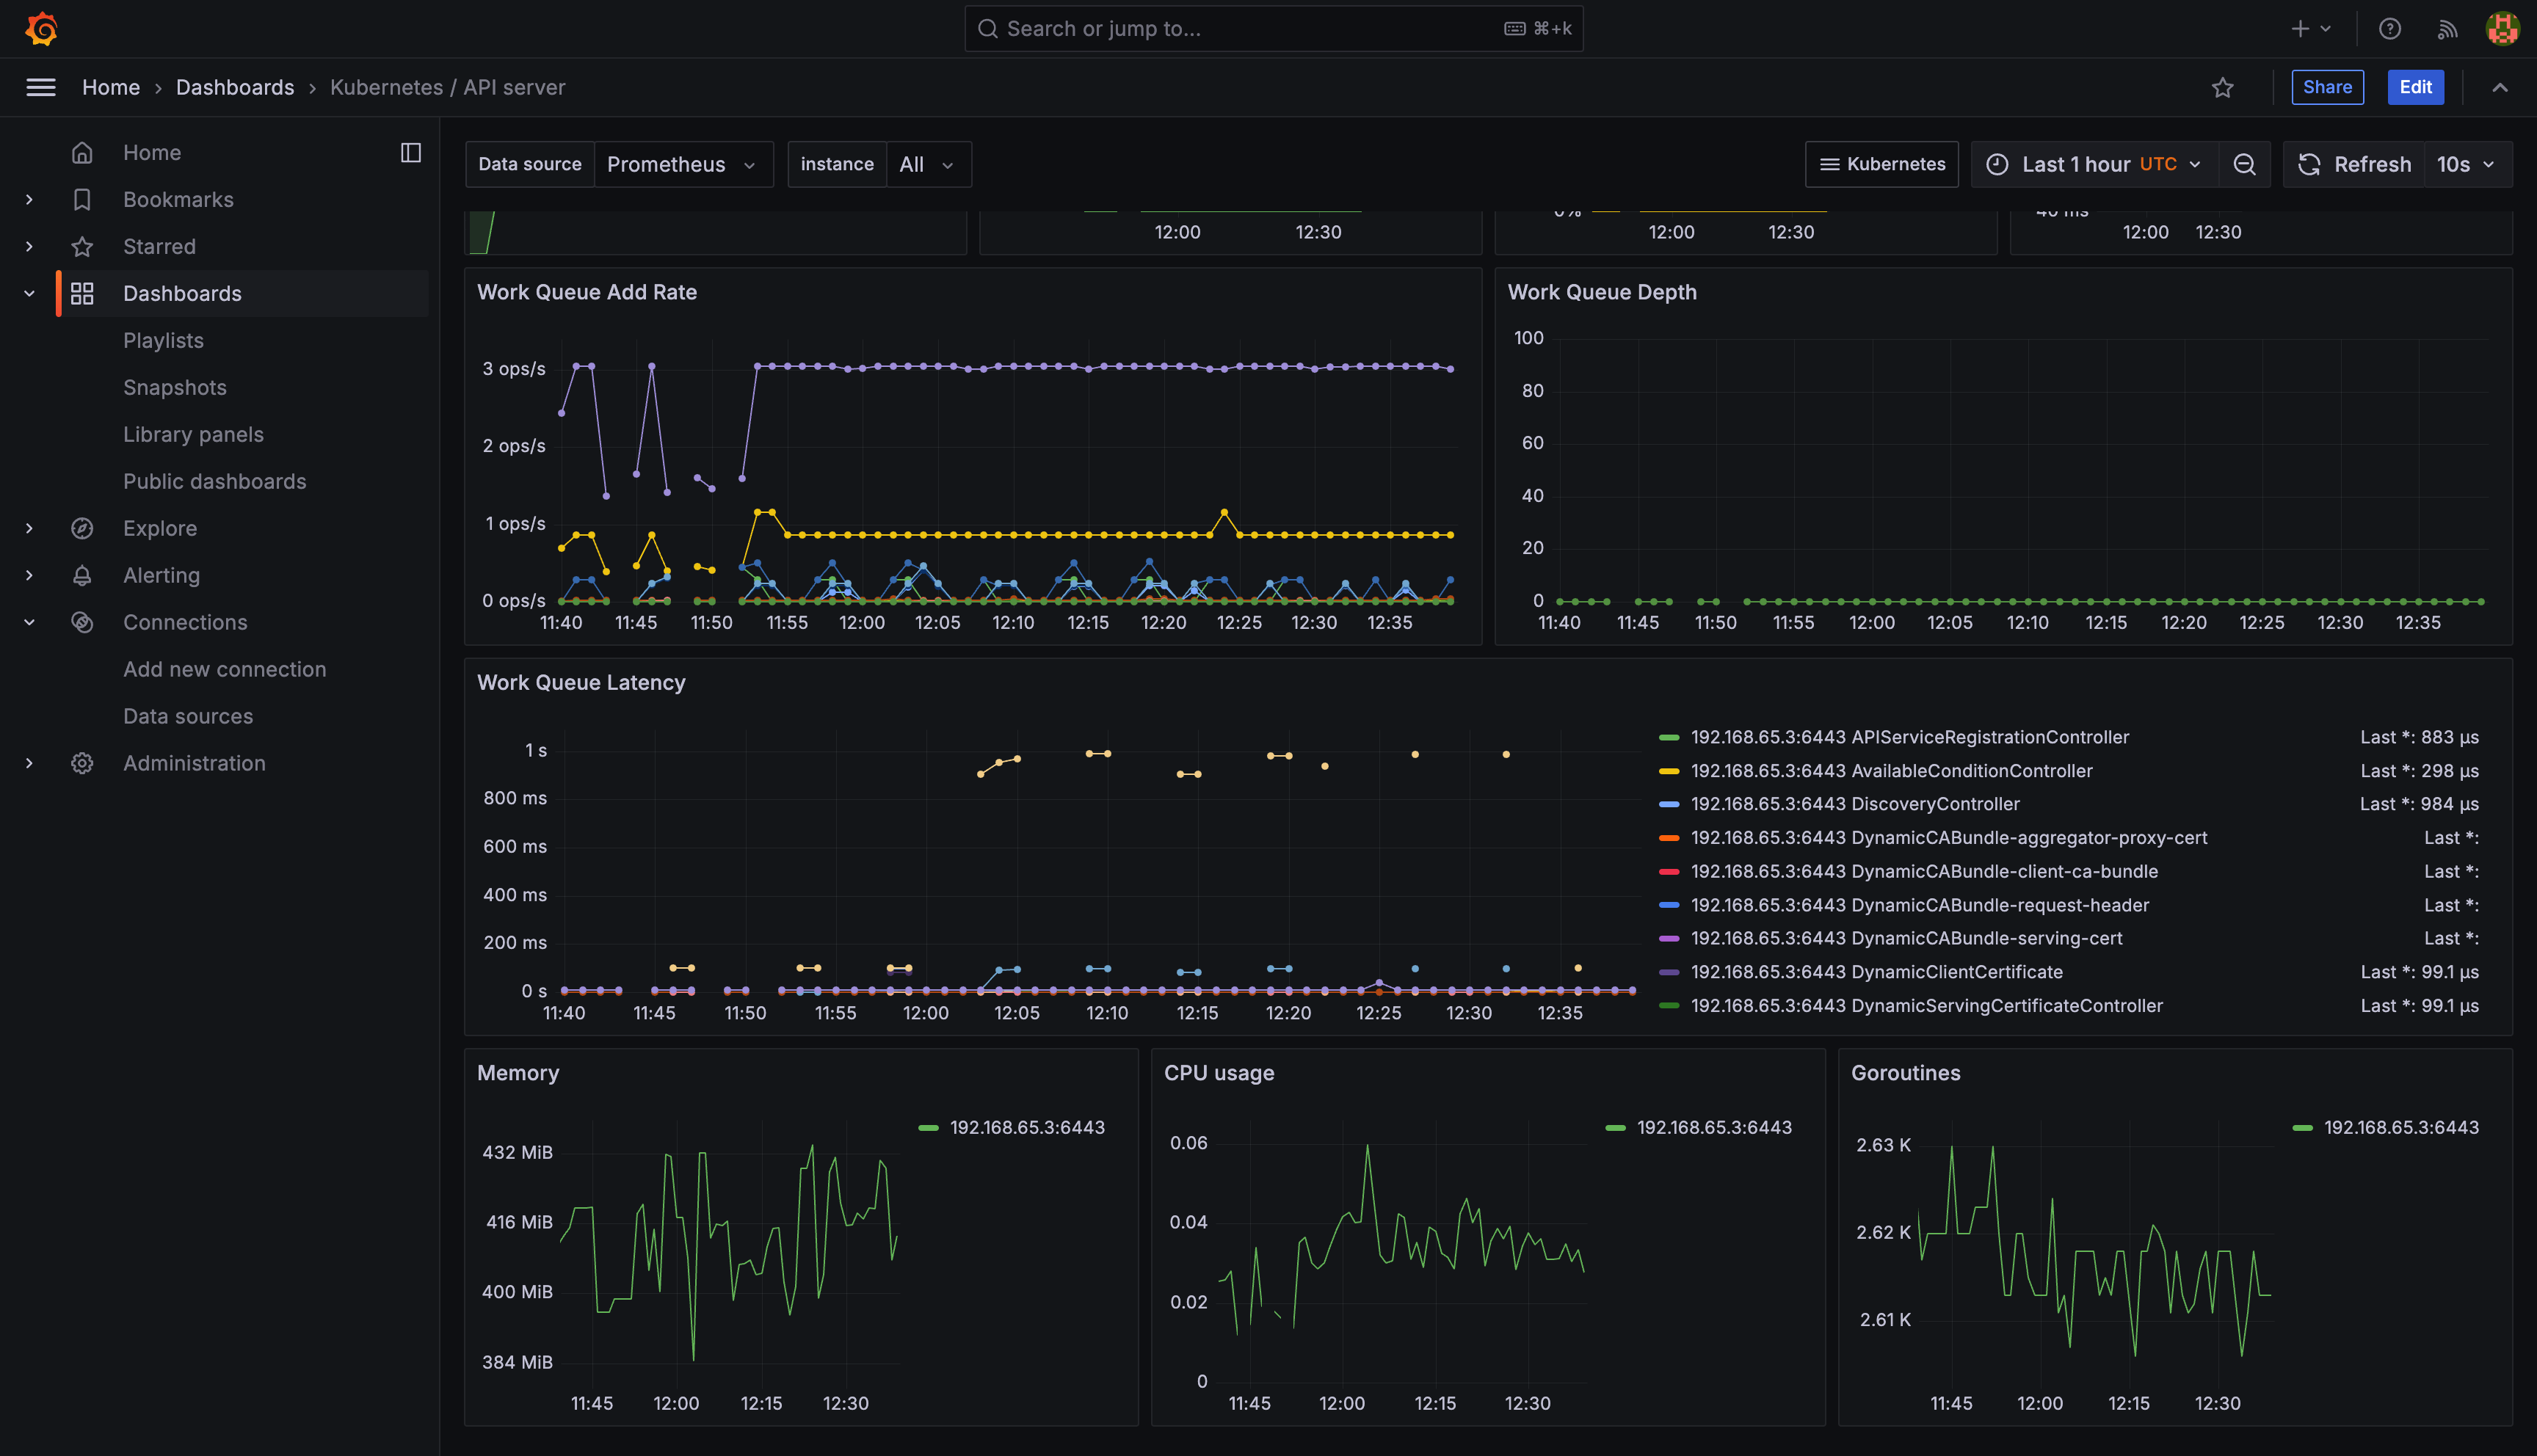
Then, visit http://localhost:9999 and log in with the credentials retrieved in the previous step.
Summary
This is an MVP version of a Nest.js microservices project, covering the basics of coding, building, and deploying. However, there’s still a long way to go. Challenges such as security, high availability, and performance optimization remain to be addressed. If you have ideas or suggestions, feel free to reach out to me @YanceyOfficial on X or comment this article directly. Your input is always welcome as we work towards making this project more robust and production-ready.

PREVIOUS POST
Vite 源码解析(4) - 开发服务篇

NEXT POST
How to manually install Electron in your APP