
Vite 源码解析(1) - 配置篇
欢迎来到 Vite 源码解析系列. Vite 作为新时代的打包神器, 缝合了, 哦不, 集成了 ES Module, bundleless, esbulid, rollup 等优秀思想和特性. 本系列假设你已经使用过 Vite, 对 Vite 配置, 插件机制有一定了解. 并且对 esbuild, rollup 的配置有一定了解.
createServer
在讲 vite 如何处理用户配置参数时, 我们先大概总览一下 `createServer` 函数, 这个函数是 vite 处理整个开发
- 获取 config 配置
- 创建 http 服务器 httpServer
- 创建 WebSocket 服务器 ws
- 通过 chokidar 创建监听器 watcher
- 创建一个兼容 rollup 钩子函数的对象 container
- 创建模块依赖图实例 moduleGraph
- 声明 server 对象
- 注册 watcher 回调
- 执行插件中的 configureServer 钩子函数(注册用户定义的前置中间件), 并收集用户定义的后置中间件
- 注册中间件
- 注册用户定义的后置中间件
- 注册转换 html 文件的中间件和未找到文件的 404 中间件
- 重写 httpServer.listen
- 返回 server 对象
export async function createServer(inlineConfig) {
  // 获取 config 配置
  const config = await resolveConfig(inlineConfig, "serve", "development");
  // 获取项目根路径
  const root = config.root;
  // 获取本地服务器相关的配置
  const serverConfig = config.server;
  // 创建中间件实例
  const middlewares = connect() as Connect.Server;
  // 创建 http 服务器
  const httpServer = await resolveHttpServer(
    serverConfig,
    middlewares,
    httpsOptions
  );
  // 创建 WebSocket 服务器
  const ws = createWebSocketServer(httpServer, config, httpsOptions);
  // ignored: 忽略监听的文件;
  // watchOptions: 对应 server.watch 配置, 传递给 chokidar 的文件系统监视器选项
  const { ignored = [], ...watchOptions } = serverConfig.watch || {};
  // 通过 chokidar 监听文件
  const watcher = chokidar.watch(path.resolve(root), {
    ignored: [
      "**/node_modules/**",
      "**/.git/**",
      ...(Array.isArray(ignored) ? ignored : [ignored]),
    ],
    ignoreInitial: true,
    ignorePermissionErrors: true,
    disableGlobbing: true,
    ...watchOptions,
  }) as FSWatcher;
  // 获取 所有插件
  const plugins = config.plugins;
  // 创建插件容器, 是一个对象, 对象的属性是 vite 支持的 rollup 的钩子函数, 后面会介绍
  // 比如 options, resolveId, load, transform
  const container = await createPluginContainer(config, watcher);
  // 创建Vite 的 ModuleGraph 实例, 后面也会介绍
  const moduleGraph = new ModuleGraph(container);
  // 声明 server 对象
  const server: ViteDevServer = {
    config, // 包含命令行传入的配置 和 配置文件的配置
    middlewares,
    get app() {
      return middlewares;
    },
    httpServer, // http 服务器
    watcher, // 通过 chokidar 监听文件
    pluginContainer: container, // vite 支持的 rollup 的钩子函数
    ws, // WebSocket 服务器
    moduleGraph, // ModuleGraph 实例
    transformWithEsbuild,
    transformRequest(url, options) {},
    listen(port?: number, isRestart?: boolean) {},
    _optimizeDepsMetadata: null,
    _isRunningOptimizer: false,
    _registerMissingImport: null,
    _pendingReload: null,
    _pendingRequests: Object.create(null),
  };
  // 被监听文件发生变化时触发
  watcher.on("change", async (file) => {});
  // 添加文件时触发
  watcher.on("add", (file) => {});
  watcher.on("unlink", (file) => {});
  // 执行插件中的 configureServer 钩子函数
  // configureServer: https://vitejs.cn/guide/api-plugin.html#configureserver
  const postHooks: ((() => void) | void)[] = [];
  for (const plugin of plugins) {
    if (plugin.configureServer) {
      // configureServer 可以注册前置中间件, 就是在内部中间件之前执行; 也可以注册后置中间件
      // 如果configureServer 返回一个函数, 这个函数内部就是注册后置中间件, 并将这些函数收集到 postHooks 中
      postHooks.push(await plugin.configureServer(server));
    }
  }
  // 接下来就是注册中间件
  // base
  if (config.base !== "/") {
    middlewares.use(baseMiddleware(server));
  }
  // ...
  // 主要转换中间件
  middlewares.use(transformMiddleware(server));
  // ...
  // 如果请求路径是 /结尾, 则将路径修改为 /index.html
  if (!middlewareMode || middlewareMode === "html") {
    middlewares.use(spaFallbackMiddleware(root));
  }
  // 调用用户定义的后置中间件
  postHooks.forEach((fn) => fn && fn());
  if (!middlewareMode || middlewareMode === "html") {
    // 如果请求的url是 html 则调用插件中所有的 transformIndexHtml 钩子函数, 转换html, 并将转换后的 html 代码发送给客户端
    middlewares.use(indexHtmlMiddleware(server));
    // handle 404s
    middlewares.use(function vite404Middleware(_, res) {
      res.statusCode = 404;
      res.end();
    });
  }
  if (!middlewareMode && httpServer) {
    // 重写 httpServer.listen, 在服务器启动前预构建
    const listen = httpServer.listen.bind(httpServer);
    httpServer.listen = (async (port: number, ...args: any[]) => {}) as any;
  } else {
    // ...
  }
  return server;
}
resolveConfig
`createServer` 中调用的第一个函数是 `resolveConfig`, 也就是解析用户配置. 和其他的构建工具一样, vite 也提供 `vite.config.js` 来作为它的配置文件, 因此 vite 首要目标是要读取和解析配置文件. vite 的配置分为共享配置, 开发服务器配置, 构建选项配置, 依赖优化选项配置, ssr 选项配置和 worker 配置.
该函数第一个参数是 `inlineConfig`, 也就是我们在命令行中指定的配置; 第二个参数是指定的命令模式, 有 `serve` 和 `build` 两种, 开发环境显然是前者; 第三个参数是指定的环境.
export async function resolveConfig(
  inlineConfig: InlineConfig,
  command: "build" | "serve", // 命令
  defaultMode = "development" // 环境
): Promise<ResolvedConfig> {
  let config = inlineConfig; // 命令行中的配置项
  let configFileDependencies: string[] = [];
  let mode = inlineConfig.mode || defaultMode;
  const configEnv = {
    mode, // 环境, 开发环境下是 development
    command, // 命令, 开发环境下是 serve
  };
  let { configFile } = config; // 配置文件路径
  // ...
}
loadConfigFromFile
在 `resolveConfig` 函数中, 首先执行的函数是 `loadConfigFromFile`, 这个函数是用来加载配置文件的. 可以看到, 如果你不显式的将 `configFile` 设为 `false`, 它会执行 `loadConfigFromFile` 函数, 配置文件可能来自用户指定的文件, 也可能是缺省配置文件, 比如 `vite.config.js`.
const loadResult = await loadConfigFromFile(
  configEnv,
  configFile,
  config.root,
  config.logLevel
);
判断是否为 ESM
在 `loadConfigFromFile` 函数中, 它首先去寻找你工程根目录下的 `package.json` 文件, 如果配置了 `module` 属性, 说明你的项目支持 ESM 规范, 故把内部变量 `isESM` 设为 `true`.
try {
  const pkg = lookupFile(configRoot, ["package.json"]);
  if (pkg && JSON.parse(pkg).type === "module") {
    isESM = true;
  }
} catch (e) {}
解析配置文件路径
接下来, 在 `loadConfigFromFile` 函数中, 如果你手动提供了配置文件的(相对)路径, 则直接获取这个配置文件的绝对路径, 否则, 它会读取是否有缺省的配置文件路径, 比如 `vite.config.js`, `vite.config.mjs`, `vite.config.ts`, `vite.config.cjs`.
if (configFile) {
  // explicit config path is always resolved from cwd
  resolvedPath = path.resolve(configFile);
  isTS = configFile.endsWith(".ts");
  if (configFile.endsWith(".mjs")) {
    isESM = true;
  }
} else {
  // implicit config file loaded from inline root (if present)
  // otherwise from cwd
  const jsconfigFile = path.resolve(configRoot, "vite.config.js");
  if (fs.existsSync(jsconfigFile)) {
    resolvedPath = jsconfigFile;
  }
  if (!resolvedPath) {
    const mjsconfigFile = path.resolve(configRoot, "vite.config.mjs");
    if (fs.existsSync(mjsconfigFile)) {
      resolvedPath = mjsconfigFile;
      isESM = true;
    }
  }
  if (!resolvedPath) {
    const tsconfigFile = path.resolve(configRoot, "vite.config.ts");
    if (fs.existsSync(tsconfigFile)) {
      resolvedPath = tsconfigFile;
      isTS = true;
    }
  }
  if (!resolvedPath) {
    const cjsConfigFile = path.resolve(configRoot, "vite.config.cjs");
    if (fs.existsSync(cjsConfigFile)) {
      resolvedPath = cjsConfigFile;
      isESM = false;
    }
  }
}
加载/解析配置文件
在读取到了配置文件的绝对路径之后就要开始解析了, 源码如下所示.
由于上面 vite 区分了 isESM, isTS, 抑或着普通的 js 文件. 因此如果明确了 isESM, 就可以使用 `dynamicImport` 函数进行加载(当然后面 vite 应该会换成原生的 `import()`). 而对于 isTS, 稍微 hack 了一下, 先打包编译成 js, 然后再将这个 js 代码写入磁盘, 再加载这个被编译后的 js 文件, 完成后删除这个临时 js 文件.
try {
  let userConfig: UserConfigExport | undefined;
  if (isESM) {
    const fileUrl = pathToFileURL(resolvedPath); // 拿到 file:/// 的路径
    const bundled = await bundleConfigFile(resolvedPath, true); // 用 esbuild 打包配置文件, 如 vite.config.js
    // bundleConfigFile 内调用的 esbuild 的配置, 然后设置了 metafile: true 用于生成依赖关系
    // 并且使用插件 externalize-dep 来保证不会将第三方库打包在 bundle 中, 即生成的依赖也不会包含第三方库
    // 所以这里的 dependencies 内容, 只包含用户自己写的文件
    // 具体 bundleConfigFile 函数下面会讲到
    dependencies = bundled.dependencies;
    if (isTS) {
      // before we can register loaders without requiring users to run node
      // with --experimental-loader themselves, we have to do a hack here:
      // bundle the config file w/ ts transforms first, write it to disk,
      // load it with native Node ESM, then delete the file.
      fs.writeFileSync(resolvedPath + ".js", bundled.code); // 写入磁盘
      userConfig = (await dynamicImport(`${fileUrl}.js?t=${Date.now()}`))
        .default; // 加载
      fs.unlinkSync(resolvedPath + ".js"); // 删除
      debug(`TS + native esm config loaded in ${getTime()}`, fileUrl);
    } else {
      // 使用 Function 来避免被 TS/Rollup 编译掉附加一个查询,
      // 以便我们在服务器重启的情况下强制重新加载新配置
      // using Function to avoid this from being compiled away by TS/Rollup
      // append a query so that we force reload fresh config in case of
      // server restart
      userConfig = (await dynamicImport(`${fileUrl}?t=${Date.now()}`)).default;
      debug(`native esm config loaded in ${getTime()}`, fileUrl);
    }
  }
  if (!userConfig) {
    // Bundle config file and transpile it to cjs using esbuild.
    const bundled = await bundleConfigFile(resolvedPath);
    dependencies = bundled.dependencies;
    // 对于普通的 cjs, 就使用 module 下的模块加载
    userConfig = await loadConfigFromBundledFile(resolvedPath, bundled.code);
    debug(`bundled config file loaded in ${getTime()}`);
  }
  // 我们知道 vite 的配置文件可以是 defineConfig({}) 的形式
  // 也可以是普通的对象, 不管怎样, 都应该返回一个对象才对
  const config = await(
    typeof userConfig === "function" ? userConfig(configEnv) : userConfig
  );
  if (!isObject(config)) {
    throw new Error(`config must export or return an object.`);
  }
  return {
    // 对路径进行了规范化处理, 在解析路径时使用 POSIX 分隔符, 兼容 win32 分割符
    path: normalizePath(resolvedPath),
    config,
    dependencies,
  };
} catch (e) {
  createLogger(logLevel).error(
    colors.red(`failed to load config from ${resolvedPath}`),
    { error: e }
  );
  throw e;
}
讲一讲 pathToFileURL
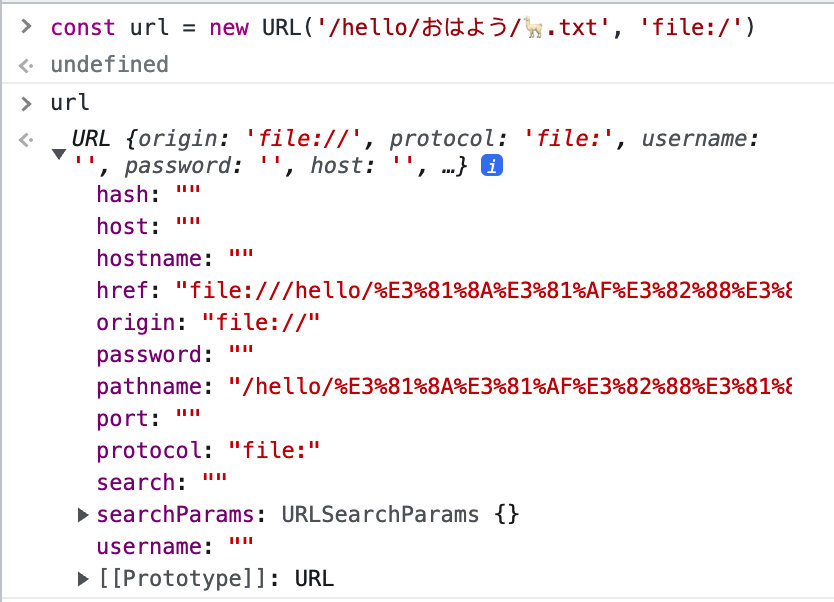
首先看 `pathToFileURL`, 它来自 `node:url` 中的原生函数, 用来转换路径为 `file:` 协议, 并且可以对路径进行 encode. 我们看下面这个例子:
import { pathToFileURL } from "url";
pathToFileURL("/hello/おはよう/🦙.txt");
// URL {
//   href: 'file:///hello/%E3%81%8A%E3%81%AF%E3%82%88%E3%81%86/%F0%9F%A6%99.txt',
//   origin: 'null',
//   protocol: 'file:',
//   username: '',
//   password: '',
//   host: '',
//   hostname: '',
//   port: '',
//   pathname: '/hello/%E3%81%8A%E3%81%AF%E3%82%88%E3%81%86/%F0%9F%A6%99.txt',
//   search: '',
//   searchParams: URLSearchParams {},
//   hash: ''
// }
可以看到, 它返回的是 URL 类型. 没错, 就是我们在浏览器中看到的那个 URL.
`node:url` 也有个 URL 构造函数, 但比起 `pathToFileURL`, 它无法对路径进行 encode, 这也大抵是 core team 不选择 URL 的原因. 我们看一下官方的例子:
import { pathToFileURL } from "node:url";
new URL("/foo#1", "file:"); // Incorrect: file:///foo#1
pathToFileURL("/foo#1"); // Correct:   file:///foo%231 (POSIX)
new URL("/some/path%.c", "file:"); // Incorrect: file:///some/path%.c
pathToFileURL("/some/path%.c"); // Correct:   file:///some/path%25.c (POSIX)
最后再说一点, `pathToFileURL` 的返回值是 URL 类型, 可以对它使用 `toString` 函数, 就能获得 URL 中的 href 属性. 因此, vite 源码中直接使用模板字面量, 也就是 `${fileUrl}.js?t=${Date.now()}`, 就把 `fileUrl` 转换成了字符串了.
用 esbuild 解析配置文件
`bundleConfigFile` 使用 esbuild 来编译配置文件, 这需要你有一定的 esbuild 知识储备才行. 这块代码难度不大, 直接写在注释里, 具体代码如下:
async function bundleConfigFile(
  fileName: string,
  isESM = false
): Promise<{ code: string; dependencies: string[] }> {
  const importMetaUrlVarName = "__vite_injected_original_import_meta_url";
  const result = await build({
    absWorkingDir: process.cwd(), // 绝对根路径
    entryPoints: [fileName], // 配置文件的绝对路径
    outfile: "out.js", // 输出的文件名
    write: false, // 不写入到磁盘, 仅仅能拿到编译结果即可
    platform: "node", // 编译到的目标平台, 'browser' | 'node' | 'neutral', 这里显然是 node
    bundle: true, // 是否打包
    format: isESM ? "esm" : "cjs", // 通过上一步拿到的 isESM 判断打包成的形式
    sourcemap: "inline", // 内联 sourcemap
    metafile: true, // 元信息, 一般这个用做打包分析, 类似于 webpack 中的 `stats.json`
    define: {
      // import.meta 是原生 ESM 中的 API, 下面是一个例子
      // <script type="module" src="my-module.mjs"></script>
      // console.log(import.meta.url); // "file:///home/user/my-module.mjs"
      "import.meta.url": importMetaUrlVarName,
    },
    plugins: [
      {
        // 在解析时查找哪些是三方依赖, 标记上 external, 不把它们打包进来
        // 比如下面这段配置:
        /*
        import { defineConfig } from 'vite'
        import react from '@vitejs/plugin-react'
        // https://vitejs.dev/config/
        export default defineConfig({
          plugins: [react()],
        })
        */
        // 就可以拿到以下三个依赖, 显然应该被打上 external 的是后两个
        // ./vite.config.js
        // vite
        // @vitejs/plugin-react
        name: "externalize-deps",
        setup(build) {
          build.onResolve({ filter: /.*/ }, (args) => {
            const id = args.path;
            if (id[0] !== "." && !path.isAbsolute(id)) {
              return {
                external: true,
              };
            }
          });
        },
      },
      {
        // 在加载时注入一些额外代码
        // 需要注意的是, 由于 __filename, __dirname 以及 import.meta.url 被这个 plugin 替换了.
        // 如果使用这些名称作为变量名可能会导致代码报错.
        name: "inject-file-scope-variables",
        setup(build) {
          build.onLoad({ filter: /\.[jt]s$/ }, async (args) => {
            const contents = await fs.promises.readFile(args.path, "utf8");
            const injectValues =
              `const __dirname = ${JSON.stringify(path.dirname(args.path))};` +
              `const __filename = ${JSON.stringify(args.path)};` +
              `const ${importMetaUrlVarName} = ${JSON.stringify(
                pathToFileURL(args.path).href
              )};`;
            return {
              loader: args.path.endsWith(".ts") ? "ts" : "js",
              contents: injectValues + contents,
            };
          });
        },
      },
    ],
  });
  const { text } = result.outputFiles[0];
  return {
    code: text, // 被编译后的代码的文本
    dependencies: result.metafile ? Object.keys(result.metafile.inputs) : [], //  这里用来获取 vite.config.js 中导入的非第三方文件列表(比如自定义插件, 方法文件等)
  };
}
dynamicImport
接下来, 我们看到有一个 `dynamicImport` 函数, 比较有意思. 它的作用是动态加载代码, 并且返回一个 Promise, 这个 Promise 就是模块的加载结果.
export const dynamicImport = usingDynamicImport
  ? new Function("file", "return import(file)")
  : _require;
它有两种方式, 一个是原生 `node:module` 下的 `createRequire` 函数, 我写个例子如下. NodeJS 官网写 Must be a file URL object, file URL string, or absolute path string., 不过我看着写相对路径也 OJBK.
import { createRequire } from "module";
const _require = createRequire(import.meta.url);
const siblingModule = _require("./hello.ts");
console.log(siblingModule); // 打印出 hello.ts 中的代码
第二种方式你可以看到在 `new Function` 的参数里面注入了代码字符串, 如果你不熟悉这种语法的话, 想必也能联想的 eval, 没错, `new Function` 执行代码字符串性能, 安全性要比 eval 高的高, 具体可以看 never_use_eval 这篇文章.
其实 vite 早期代码, 尤大也是用 eval 写的, 后来才改成了 Function. 具体 MR 可以看 fix: use Function instead of eval to dynamically import config files (#5213)
async function dynamicImport() {
  const _require = new Function("file", "return import(file)");
  await _require("./hello.js");
}
dynamicImport();
loadConfigFromBundledFile
而对于普通的 cjs 配置文件, 它的解析就类似于上面所说的 `createRequire` 方式.
这里开始使用 `fs.realpathSync` 是为了打平万恶的 Windows 路径格式, 具体可以看 Vite cannot load configuration files in the link directory (#4180) 这个 issue.
下面就是一些骚操作了. 使用了 `_require.extensions[".js"]`, 也就是以 js 的方式处理模块, 不过最新版的 NodeJS 已经要把 `extensions` 废弃了(看不懂的借口), 总之这玩意儿就是解析 `vite.config.js`.
const _require = createRequire(import.meta.url);
async function loadConfigFromBundledFile(
  fileName: string,
  bundledCode: string
): Promise<UserConfig> {
  const realFileName = fs.realpathSync(fileName);
  const defaultLoader = _require.extensions[".js"];
  _require.extensions[".js"] = (module: NodeModule, filename: string) => {
    if (filename === realFileName) {
      (module as NodeModuleWithCompile)._compile(bundledCode, filename);
    } else {
      defaultLoader(module, filename);
    }
  };
  // clear cache in case of server restart
  delete _require.cache[_require.resolve(fileName)];
  const raw = _require(fileName);
  _require.extensions[".js"] = defaultLoader;
  return raw.__esModule ? raw.default : raw;
}
mergeConfig
当配置解析完成后, 会通过 `mergeConfig` 函数将配置文件中的配置和 `inlineConfig` 合并, 最终为 vite 提供运行时的框架配置. 该函数会递归地调用 `mergeConfigRecursively` 函数.
if (loadResult) {
  config = mergeConfig(loadResult.config, config); // 合并配置
  configFile = loadResult.path; // 获取配置文件绝对路径
  configFileDependencies = loadResult.dependencies; // 获取 vite.config.js 中导入的非第三方文件列表(比如自定义插件, 方法文件等)
}
关于 `mergeConfigRecursively`, 大抵来讲就是把内联的配置跟配置文件合并到一起, 看到递归就头大, 直接看注释吧.
function mergeConfigRecursively(
  defaults: Record<string, any>, // 配置文件
  overrides: Record<string, any>, // 内联配置
  rootPath: string
) {
  const merged: Record<string, any> = { ...defaults };
  for (const key in overrides) {
    const value = overrides[key];
    if (value == null) {
      continue;
    }
    const existing = merged[key];
    if (existing == null) {
      merged[key] = value;
      continue;
    }
    // alias 是给 `@rollup/plugin-alias` 传参, vite 需要 format 一下
    // 这是 aliasa 的签名: Record<string, string> | Array<{ find: string | RegExp, replacement: string, customResolver?: ResolverFunction | ResolverObject }>
    //
    // 下面是一个例子:
    //  alias({
    //   entries: [
    //     { find: 'utils', replacement: '../../../utils' },
    //     { find: 'batman-1.0.0', replacement: './joker-1.5.0' }
    //   ]
    // })
    if (key === "alias" && (rootPath === "resolve" || rootPath === "")) {
      merged[key] = mergeAlias(existing, value);
      continue;
      // merge 资源类型, 常见的像 jpg, webp, mp3 等等
    } else if (key === "assetsInclude" && rootPath === "") {
      merged[key] = [].concat(existing, value);
      continue;
    } else if (
      key === "noExternal" &&
      rootPath === "ssr" &&
      (existing === true || value === true)
    ) {
      merged[key] = true;
      continue;
    }
    // 数组的直接 merge 过来
    if (Array.isArray(existing) || Array.isArray(value)) {
      merged[key] = [...arraify(existing ?? []), ...arraify(value ?? [])];
      continue;
    }
    // 对象继续递归下去
    if (isObject(existing) && isObject(value)) {
      merged[key] = mergeConfigRecursively(
        existing,
        value,
        rootPath ? `${rootPath}.${key}` : key
      );
      continue;
    }
    merged[key] = value;
  }
  return merged;
}
对插件的前置处理
接下来我们看一下对 plugin 的处理, 这也是本篇比较重点的地方. 由于 vite 的 plugins 的签名是 `(Plugin | Plugin[])[]`, 因此需要先打平成一层操作. 然后过滤掉那些无效的插件, 接下来, 由于插件存在 apply 属性(签名如下):
apply?: 'serve' | 'build' | ((config: UserConfig, env: ConfigEnv) => boolean)
- 如果没提供该属性, 说明开发/生产环境都可用该插件
- 如果是个函数, 那就看看它在当前环境(
`'serve' | 'build'`)是否应该存在 - 否则给它赋上当前的环境(
`'serve' | 'build'`) 接下来是`sortUserPlugins`函数, 由于 vite plugin 提供了`enforce`参数, 该参数的值可以是`pre`或`post`, 这个函数就是用来给插件排排坐. 最后就好说了, 就是遍历所有合法的, 已排序的好插件数组, 逐一执行每个插件的`config`函数, 并注入 configEnv, 因为 config 钩子函数可以修改配置项, 并返回新的配置项, 拿到新的配置项之后, 让新的配置项和老的配置项合并. 需要注意的是,`config`函数在解析 vite 配置前调用. 钩子接收原始用户配置(命令行选项指定的会与配置文件合并)和一个描述配置环境的变量. 走一遍 config 函数之后, 再合并到配置中.
// resolve plugins
const rawUserPlugins = (config.plugins || []).flat(Infinity).filter((p) => {
  if (!p) {
    return false;
  } else if (!p.apply) {
    // 如果没提供 apply, 说明开发/生产环境都可用该插件
    return true;
  } else if (typeof p.apply === "function") {
    return p.apply({ ...config, mode }, configEnv); // 如果是个函数, 那就看看它在当前环境(`'serve' | 'build'`)是否应该存在
  } else {
    return p.apply === command; // 否则给它赋上当前的环境(`'serve' | 'build'`)
  }
}) as Plugin[];
const [prePlugins, normalPlugins, postPlugins] =
  sortUserPlugins(rawUserPlugins); // 排排坐
// run config hooks
const userPlugins = [...prePlugins, ...normalPlugins, ...postPlugins];
for (const p of userPlugins) {
  if (p.config) {
    const res = await p.config(config, configEnv); // 执行插件的 config 钩子, 它执行于在解析 vite 配置前
    if (res) {
      config = mergeConfig(config, res); // 合并到配置中
    }
  }
}
接下来, 我们看到一个内置的 resolver, 也就是 `createResolver`, 它主要调用了:
`createPluginContainer`, 这个函数用于创建插件容器, 是一个对象, 对象的属性是 vite 支持的 rollup 的钩子函数, 比如 options, resolveId, load, transform, 简单说就是 vite 打通 rollup 插件系统的桥梁, 这个我们下一篇重点说.`aliasPlugin`: 不多说, 这是 rollup 体系下的一个插件, 我们上面说到了用户可以传递 alias 到 vite, 而这个插件就是把上面解析的 alias 透传给 rollup
// create an internal resolver to be used in special scenarios, e.g.
// optimizer & handling css @imports
const createResolver: ResolvedConfig["createResolver"] = (options) => {
  let aliasContainer: PluginContainer | undefined;
  let resolverContainer: PluginContainer | undefined;
  return async (id, importer, aliasOnly, ssr) => {
    let container: PluginContainer;
    if (aliasOnly) {
      container =
        aliasContainer ||
        (aliasContainer = await createPluginContainer({
          ...resolved,
          plugins: [aliasPlugin({ entries: resolved.resolve.alias })],
        }));
    } else {
      container =
        resolverContainer ||
        (resolverContainer = await createPluginContainer({
          ...resolved,
          plugins: [
            aliasPlugin({ entries: resolved.resolve.alias }),
            resolvePlugin({
              ...resolved.resolve,
              root: resolvedRoot,
              isProduction,
              isBuild: command === "build",
              ssrConfig: resolved.ssr,
              asSrc: true,
              preferRelative: false,
              tryIndex: true,
              ...options,
            }),
          ],
        }));
    }
    return (await container.resolveId(id, importer, { ssr }))?.id;
  };
};
对环境变量的处理
由于 vite 使用了 ESM, 因此它使用 `import.meta.env`, 来注入内置环境变量:
`import.meta.env.MODE`: {string} 应用运行的模式.`import.meta.env.BASE_URL`: {string} 部署应用时的基本 URL. 他由 base 配置项决定.`import.meta.env.PROD`: {boolean} 应用是否运行在生产环境.`import.meta.env.DEV`: {boolean} 应用是否运行在开发环境 (永远与`import.meta.env.PROD`相反). 和 create-react-app 一样, vite 也支持用户自建的环境变量文件, 与内置的进行合并或者替换. 其中优先级也是`.env.xxx.local`>`.env.xxx`>`.env.local`>`.env`, 并且为了防止意外地将一些环境变量泄漏到客户端, 只有以`VITE_`为前缀的变量才会暴露给经过 vite 处理的代码. 关于环境变量的文档可以参考官网 env-variables-and-modes.
// load .env files
const envDir = config.envDir
  ? normalizePath(path.resolve(resolvedRoot, config.envDir))
  : resolvedRoot;
const userEnv =
  inlineConfig.envFile !== false &&
  loadEnv(mode, envDir, resolveEnvPrefix(config));
我们详细看一下 `loadEnv` 这个函数.
首先看下 `mode`, 官网写的很清楚, 其实就是环境变量的名称, 不限于我们常用的 `development`, `production`. 你可以根据需要起名叫 `testing`, `staging`. 但是它不能叫 `local`, 要不 `.env.xxx(local)` 和 `.env.local` 就重复了.
然后和 CRA 一样, 只取环境变量中 `VITE_` 开头或者用户自定义前缀的, 暴露到客户端, 这样保证隐私字段(非 `VITE_` 开头的)不会被注入.
vite 用到了 dotenvExpand 这个三方库, 它负责将 env 文件中的环境变量注入到 `process.env` 或者合并到某个指定对象中. 注意 vite 设置了 `ignoreProcessEnv: true`, 我们看下面一个例子就知道它是做什么的了:
const dotenv = {
  ignoreProcessEnv: true,
  parsed: {
    SHOULD_NOT_EXIST: "testing",
  },
};
const obj = dotenvExpand.expand(dotenv).parsed;
console.log(obj.SHOULD_NOT_EXIST); // testing
console.log(process.env.SHOULD_NOT_EXIST); // undefined
下面我们过一遍源码:
import fs from "fs";
import dotenv from "dotenv";
import dotenvExpand from "dotenv-expand";
import { arraify, lookupFile } from "./utils";
import type { UserConfig } from "./config";
export function loadEnv(
  mode: string,
  envDir: string,
  prefixes: string | string[] = "VITE_"
): Record<string, string> {
  if (mode === "local") {
    throw new Error(
      `"local" cannot be used as a mode name because it conflicts with ` +
        `the .local postfix for .env files.`
    );
  }
  prefixes = arraify(prefixes);
  const env: Record<string, string> = {};
  const envFiles = [
    /** mode local file */ `.env.${mode}.local`,
    /** mode file */ `.env.${mode}`,
    /** local file */ `.env.local`,
    /** default file */ `.env`,
  ];
  // check if there are actual env variables starting with VITE_*
  // these are typically provided inline and should be prioritized
  // 先把 process.env 中 VITE_ 开头的收集一波
  for (const key in process.env) {
    if (
      prefixes.some((prefix) => key.startsWith(prefix)) &&
      env[key] === undefined
    ) {
      env[key] = process.env[key] as string;
    }
  }
  for (const file of envFiles) {
    const path = lookupFile(envDir, [file], {
      pathOnly: true,
      rootDir: envDir,
    });
    if (path) {
      // 用 dotenv 解析 env 文件, 这个库太常见了, 不多说.
      const parsed = dotenv.parse(fs.readFileSync(path), {
        debug: process.env.DEBUG?.includes("vite:dotenv") || undefined,
      });
      // let environment variables use each other
      // 合并环境变量配置, 但不把环境变量注入到 process.env 中
      dotenvExpand({
        parsed,
        // prevent process.env mutation
        ignoreProcessEnv: true,
      } as any);
      // only keys that start with prefix are exposed to client
      // 再过滤掉非 VITE_ 开头的
      for (const [key, value] of Object.entries(parsed)) {
        if (
          prefixes.some((prefix) => key.startsWith(prefix)) &&
          env[key] === undefined
        ) {
          env[key] = value;
        } else if (
          key === "NODE_ENV" &&
          process.env.VITE_USER_NODE_ENV === undefined
        ) {
          // NODE_ENV override in .env file
          process.env.VITE_USER_NODE_ENV = value;
        }
      }
    }
  }
  return env;
}
一些杂项的处理
接下来有一些杂项需要处理, 虽说是杂项, 就是代码不是特别复杂, 所以没必要分开写了, 直接看注释.
// 创建一个 Logger 的实例
const logger = createLogger(config.logLevel, {
  allowClearScreen: config.clearScreen,
  customLogger: config.customLogger,
});
// 由于 vite 支持 worker, 所以处理一些 worker 的配置
// https://vitejs.dev/config/#worker-options
const resolvedWorkerOptions: ResolveWorkerOptions = {
  format: config.worker?.format || "iife", // worker 文件默认打包成立即执行函数的形式
  plugins: [],
  rollupOptions: config.worker?.rollupOptions || {},
};
// resolve root
// 拿到根目录路径, 默认是 process.cwd(), 也就是项目路径
// normalizePath 上面讲了, 主要是为了兼容 Windows
const resolvedRoot = normalizePath(
  config.root ? path.resolve(config.root) : process.cwd()
);
// 上面我们讲到了 alias, 这里是给内置的两个包加上 alias
const clientAlias = [
  { find: /^[\/]?@vite\/env/, replacement: () => ENV_ENTRY }, // ENV_ENTRY => dist/client/env.mjs
  { find: /^[\/]?@vite\/client/, replacement: () => CLIENT_ENTRY }, // CLIENT_ENTRY => dist/client/client.mjs
];
// resolve alias with internal client alias
// 然后将用户传的, 和内置的 alias 合并到一起
const resolvedAlias = normalizeAlias(
  mergeAlias(
    // @ts-ignore because @rollup/plugin-alias' type doesn't allow function
    // replacement, but its implementation does work with function values.
    clientAlias,
    config.resolve?.alias || []
  )
);
const resolveOptions: ResolvedConfig["resolve"] = {
  ...config.resolve,
  alias: resolvedAlias,
};
// Note it is possible for user to have a custom mode, e.g. `staging` where
// production-like behavior is expected. This is indicated by NODE_ENV=production
// loaded from `.staging.env` and set by us as VITE_USER_NODE_ENV
// 不多说, 统一下 NODE_ENV 环境变量
const isProduction =
  (process.env.NODE_ENV || process.env.VITE_USER_NODE_ENV || mode) ===
  "production";
if (isProduction) {
  // in case default mode was not production and is overwritten
  process.env.NODE_ENV = "production";
}
// 处理 build options
// 具体字段可以看 https://vitejs.dev/config/#build-target
const resolvedBuildOptions = resolveBuildOptions(config.build);
// resolve cache directory
// ok, 讲到这里我们终于看到了 node_modules/.vite 这个文件夹
// 没错, 这就是 vite 的一大杀器: 预构建
// 具体原理我们后面说, 这里只是讲下配置
const pkgPath = lookupFile(resolvedRoot, [`package.json`], { pathOnly: true });
const cacheDir = config.cacheDir
  ? path.resolve(resolvedRoot, config.cacheDir)
  : pkgPath
  ? path.join(path.dirname(pkgPath), `node_modules/.vite`)
  : path.join(resolvedRoot, `.vite`);
const { publicDir } = config;
// 解析静态文件 dir, 默认是根目录下的 public 文件夹
const resolvedPublicDir =
  publicDir !== false && publicDir !== ""
    ? path.resolve(
        resolvedRoot,
        typeof publicDir === "string" ? publicDir : "public"
      )
    : "";
// 解析 server 配置, 也就是 开发服务, hmr, ws 那一套, 下一篇我们着重来讲
// 具体配置可以看 https://vitejs.dev/config/#server-options
const server = resolveServerOptions(resolvedRoot, config.server, logger);
// 解析 ssr 相关, 因为截止到当前版本 ssr 还不够稳定, 本系列可能讲的会比较少, 看情况吧
// 具体配置可以看 https://vitejs.dev/config/#ssr-options
const ssr = resolveSSROptions(config.ssr);
// 拿到优化配置, 有 vite 本身的优化配置, 也有 esbuild 的.
const optimizeDeps = config.optimizeDeps || {};
对插件的后置处理
在一系列操作之后, 其他配置解析的差不多了, 于是 vite 会对插件进行后置处理. 首先 vite 会对 worker 的插件进行处理, 和普通用户插件一样, worker 的插件也需要经过 `sortUserPlugins` 分治的过程.
// Some plugins that aren't intended to work in the bundling of workers (doing post-processing at build time for example).
// And Plugins may also have cached that could be corrupted by being used in these extra rollup calls.
// So we need to separate the worker plugin from the plugin that vite needs to run.
const [workerPrePlugins, workerNormalPlugins, workerPostPlugins] =
  sortUserPlugins(config.worker?.plugins as Plugin[]);
const workerResolved: ResolvedConfig = {
  ...resolved,
  isWorker: true,
  mainConfig: resolved,
};
然后分别对 worker, user 两组插件进行 resolve, 使用的是 `resolvePlugins` 方法. 该方法根据 plugin 的执行顺序, 和内置通用插件进行融合.
我们知道 vite 插件有个 `configResolved` 钩子, 它在解析 vite 配置后调用. 使用这个钩子读取和存储最终解析的配置. 当插件需要根据运行的命令做一些不同的事情时, 它很有用. 所以在所有配置 resolve 之后, 会统一执行这个函数.
resolved.worker.plugins = await resolvePlugins(
  workerResolved,
  workerPrePlugins,
  workerNormalPlugins,
  workerPostPlugins
);
// call configResolved worker plugins hooks
// 在解析 vite 配置后调用. 使用这个钩子读取和存储最终解析的配置
await Promise.all(
  resolved.worker.plugins.map((p) => p.configResolved?.(workerResolved))
);
(resolved.plugins as Plugin[]) = await resolvePlugins(
  resolved,
  prePlugins,
  normalPlugins,
  postPlugins
);
// call configResolved hooks
await Promise.all(userPlugins.map((p) => p.configResolved?.(resolved)));
最后放一下 `resolvePlugins` 函数, 很明显 vite 运行依赖一些内置插件, 而用户插件可能有顺序要求(enforce), 于是就把用户插件插到适当的位置. 关于详细的插件系统, 我们放到下一篇文章讲解.
export async function resolvePlugins(
  config: ResolvedConfig,
  prePlugins: Plugin[],
  normalPlugins: Plugin[],
  postPlugins: Plugin[]
): Promise<Plugin[]> {
  const isBuild = config.command === "build";
  const isWatch = isBuild && !!config.build.watch;
  const buildPlugins = isBuild
    ? (await import("../build")).resolveBuildPlugins(config)
    : { pre: [], post: [] };
  return [
    isWatch ? ensureWatchPlugin() : null,
    isBuild ? metadataPlugin() : null,
    isBuild ? null : preAliasPlugin(config),
    aliasPlugin({ entries: config.resolve.alias }),
    ...prePlugins, // 前置插件
    config.build.polyfillModulePreload
      ? modulePreloadPolyfillPlugin(config)
      : null,
    ...(isDepsOptimizerEnabled(config)
      ? [
          isBuild
            ? optimizedDepsBuildPlugin(config)
            : optimizedDepsPlugin(config),
        ]
      : []),
    resolvePlugin({
      ...config.resolve,
      root: config.root,
      isProduction: config.isProduction,
      isBuild,
      packageCache: config.packageCache,
      ssrConfig: config.ssr,
      asSrc: true,
      getDepsOptimizer: () => getDepsOptimizer(config),
      shouldExternalize:
        isBuild && config.build.ssr && config.ssr?.format !== "cjs"
          ? (id) => shouldExternalizeForSSR(id, config)
          : undefined,
    }),
    htmlInlineProxyPlugin(config),
    cssPlugin(config),
    config.esbuild !== false ? esbuildPlugin(config.esbuild) : null,
    jsonPlugin(
      {
        namedExports: true,
        ...config.json,
      },
      isBuild
    ),
    wasmHelperPlugin(config),
    webWorkerPlugin(config),
    assetPlugin(config),
    ...normalPlugins, // 普通插件
    wasmFallbackPlugin(),
    definePlugin(config),
    cssPostPlugin(config),
    config.build.ssr ? ssrRequireHookPlugin(config) : null,
    isBuild && buildHtmlPlugin(config),
    workerImportMetaUrlPlugin(config),
    ...buildPlugins.pre,
    dynamicImportVarsPlugin(config),
    importGlobPlugin(config),
    ...postPlugins, // 后置插件
    ...buildPlugins.post,
    // internal server-only plugins are always applied after everything else
    ...(isBuild
      ? []
      : [clientInjectionsPlugin(config), importAnalysisPlugin(config)]),
  ].filter(Boolean) as Plugin[];
}
总结
最后我们贴一下最终解析的配置, 我们做一个复习:
const resolved: ResolvedConfig = {
  ...config,
  configFile: configFile ? normalizePath(configFile) : undefined, // 配置文件路径
  configFileDependencies: configFileDependencies.map((name) =>
    normalizePath(path.resolve(name))
  ), // vite.config.js 中非第三方包的导入, 比如自定义插件
  inlineConfig, // 命令行中的配置
  root: resolvedRoot, // 项目根目录
  base: BASE_URL, // 公共基础路径,  /my-app/index.html
  resolve: resolveOptions, // 文件解析时的相关配置
  publicDir: resolvedPublicDir, // 静态资源服务的文件夹
  cacheDir, // 缓存目录, 默认 node_modules/.vite
  command, // serve | build
  mode, // development | production
  ssr,
  isWorker: false,
  mainConfig: null,
  isProduction, // 是否是生产环境
  plugins: userPlugins, // 自定义 plugins
  server,
  build: resolvedBuildOptions,
  preview: resolvePreviewOptions(config.preview, server),
  env: {
    ...userEnv,
    BASE_URL,
    MODE: mode,
    DEV: !isProduction,
    PROD: isProduction,
  },
  assetsInclude(file: string) {
    return DEFAULT_ASSETS_RE.test(file) || assetsFilter(file);
  },
  logger,
  packageCache: new Map(),
  createResolver, // 特殊场景中使用的内部解析器, 预构建文件中会说到
  optimizeDeps: {
    // 由于优化依赖(也就是依赖预构建)使用了 esbuild, 这里基本就是透传 esbuild 的配置, 当然也有一些 vite 自己的配置: https://vitejs.dev/config/#dep-optimization-options
    ...optimizeDeps,
    esbuildOptions: {
      preserveSymlinks: config.resolve?.preserveSymlinks,
      ...optimizeDeps.esbuildOptions,
    },
  },
  worker: resolvedWorkerOptions,
  spa: config.spa ?? true,
};
- 使用
`mode`和`command`构造出核心的环境对象`configEnv` - 使用
`loadConfigFromFile`读取配置文件, 并使用`mergeConfig`和`inlineConfig`进行递归合并 - 将插打平, 通过
`apply`过滤出当前环境(`serve|build`) 需要的插件 - 使用
`sortUserPlugins`, 根据`enforce`字段将所有插件排排队, 存放在`prePlugins`,`normalPlugins`和`postPlugins`三个数组中 - 然后将排好队的插件执行插件中的
`config`方法, config 方法是 vite 独有的钩子方法, 它是在解析 vite 配置前调用. 执行完毕后, 再使用`mergeConfig`和当前配置进行递归合并 - 创建
`createResolver`, 特殊场景中使用的内部解析器, 预构建文件中会说到. 这个方法主要使用了`createPluginContainer`函数来连接 rollup 插件系统, 这个下一篇会说 - 处理 rootPath; 合并内置和用户自定义的 alias; 处理 env 配置; 处理 baseUrl; 处理 public 文件夹; 处理预解析缓存(
`node_modules/.vite`)目录; 解析 assetsInclude 指定文件类型作为静态资源处理; 解析 server 配置和 ssr 配置; - 创建 createResolver 方法用于内部指定场景的解析器, 比如 optimizer 或处理 css @import
- 执行
`resolvePlugins`, 合并用户配置的 plugin 和内部已有的 plugin - 依次执行排好序的插件的
`configResolved`函数(该函数在解析 vite 配置后调用. 使用这个钩子读取和存储最终解析的配置) - 返回最终 resolved
PREVIOUS POST
Introducing Hyper Chat

NEXT POST
Vite 源码解析(2) - 模块依赖图